
Introduction
Hi, my name is Alvaro Miranda I’m currently an Associate Props & Environment Artist at 2K Valencia.


Inspiration / References
I chose this environment because it’s one of my favorite sagas, it’s also a very organic piece, perfect for sculpting wood, rocks, etc.
Normally, I tend to use a big PureRef with all my references, but this time I used more of the PIP feature of my monitor to watch/view the game on a small window whilst I worked, I also used the picture mode, so I could walk around the environment or assets and study how they made them, I didn’t want to copy anything directly, but this was my primary reference for scale, shapes, etc.
First thoughts
Checking the asset for the first time I thought, in this case, to work only on one side of it and then duplicate, because only at a certain point you can see both sides at the same time and it’s possible to break the repetition with vertex paint on the engine later; another thought was that this is a realistic prop so I was sure about using a Megascans wood for the base of my texture. It’s very difficult to achieve good results from scratch in my experience, these textures are very detailed already and it’s not necessary to sculpt the smallest details because the Normal map of texture will make the work there.
Blockout
For this asset, I used Blender as my main 3d package, as you can see the block out is very rough there’s no kind of detail on it, now it’s time to jump into Zbrush.

High Poly
To manipulate the pieces like this (which, in my case, didn’t have enough subdivisions) inside Zbrush, I smoothed the lowpoly before Dynameshing it, I tend to use crease all or by angle to subdivide it a couple of times adding geometry without smooth, then, uncrease all and subdivide again allowing the smooth of the result (every piece will need different tweaks), when the prop looks fine, Dynamesh it again to make the big changes on the shapes like deep cuts and broken borders are in the mesh.
For this first iteration, I normally use the Move brush for big shape changes, Trim Dynamic to smooth/bevel the sharp edges a bit, Dam Standard to make cut lines and Trim Smooth Border with square alpha to break and restore edges or add geometry holding down the Alt key.
I tend to make things manually in my free time to explore a variety of different brushes but it’s very common to use alphas to give the wooden look to the prop more quickly.
On the last steps of high poly, I used the brushes of Dannie Carlone, which I recommend you. I added a couple of cuts under the bolts and a bit of detail grain on the wood.


When this step is finished on the whole model, now its time to take a moment for refinement, mid and small detail, I used a lot the Trim Smooth Border for this, adding small cuts, restoring the edges which are very smooth and flattening some areas to have rest zones.
For metal parts, I used the Standard Brush with square alpha and color variation stroke, with low values that can give texture to the surface, then with Trim Smooth Border giving touches trying to flatten the surface a bit, you can achieve a surface that simulates the hammer-forged metal.
Later I added a very smooth procedural noise surface on top of it.


At this moment I was pretty happy with the result, but it’s always good practice to take a few minutes of rest and come back again, fresh eyes pops new errors or new ideas.
I wrote this for myself, but if the feedback can be from a more experienced artist than you, much better.
These are the changes I made for myself:

The construction lines are very important, they give more realism to the assets. In my opinion, the feedback can sting, sometimes a lot, but is what makes us grow the most.
These are the renders in Zbrush of the finished high poly with feedback applied:


Low Poly
The environment project will be in UE5, I didn’t go too crazy with the low poly which finally has 150K tris in total (7Mb .fbx), which is like a joke to the engine.
After decimation, I was able to delete like 20/30K tris of the underground part of the wheel, but I preferred to maintain it and reduce a lot the texel of those UV islands for the moment.


UVs
Unwrapping the direction of the UVs on a wooden asset is very important, however, its a lot trickier the more triangles it has, I used RizomUV which allows you to make a selection of edges point to point based on shorted path, or select faces by angle, like back part of the planks, and cut, these tools make the job very easy.
The program unwraps the islands with a lot of triangles very well, for example, the planks in the front have only one seam splitting the back planar island from the front without important distortion.
Sometimes to achieve the direct result of the UVs on pieces like the arch is more difficult, and I had to cut it on small pieces to relax them and weld again together relaxing a bit after this.
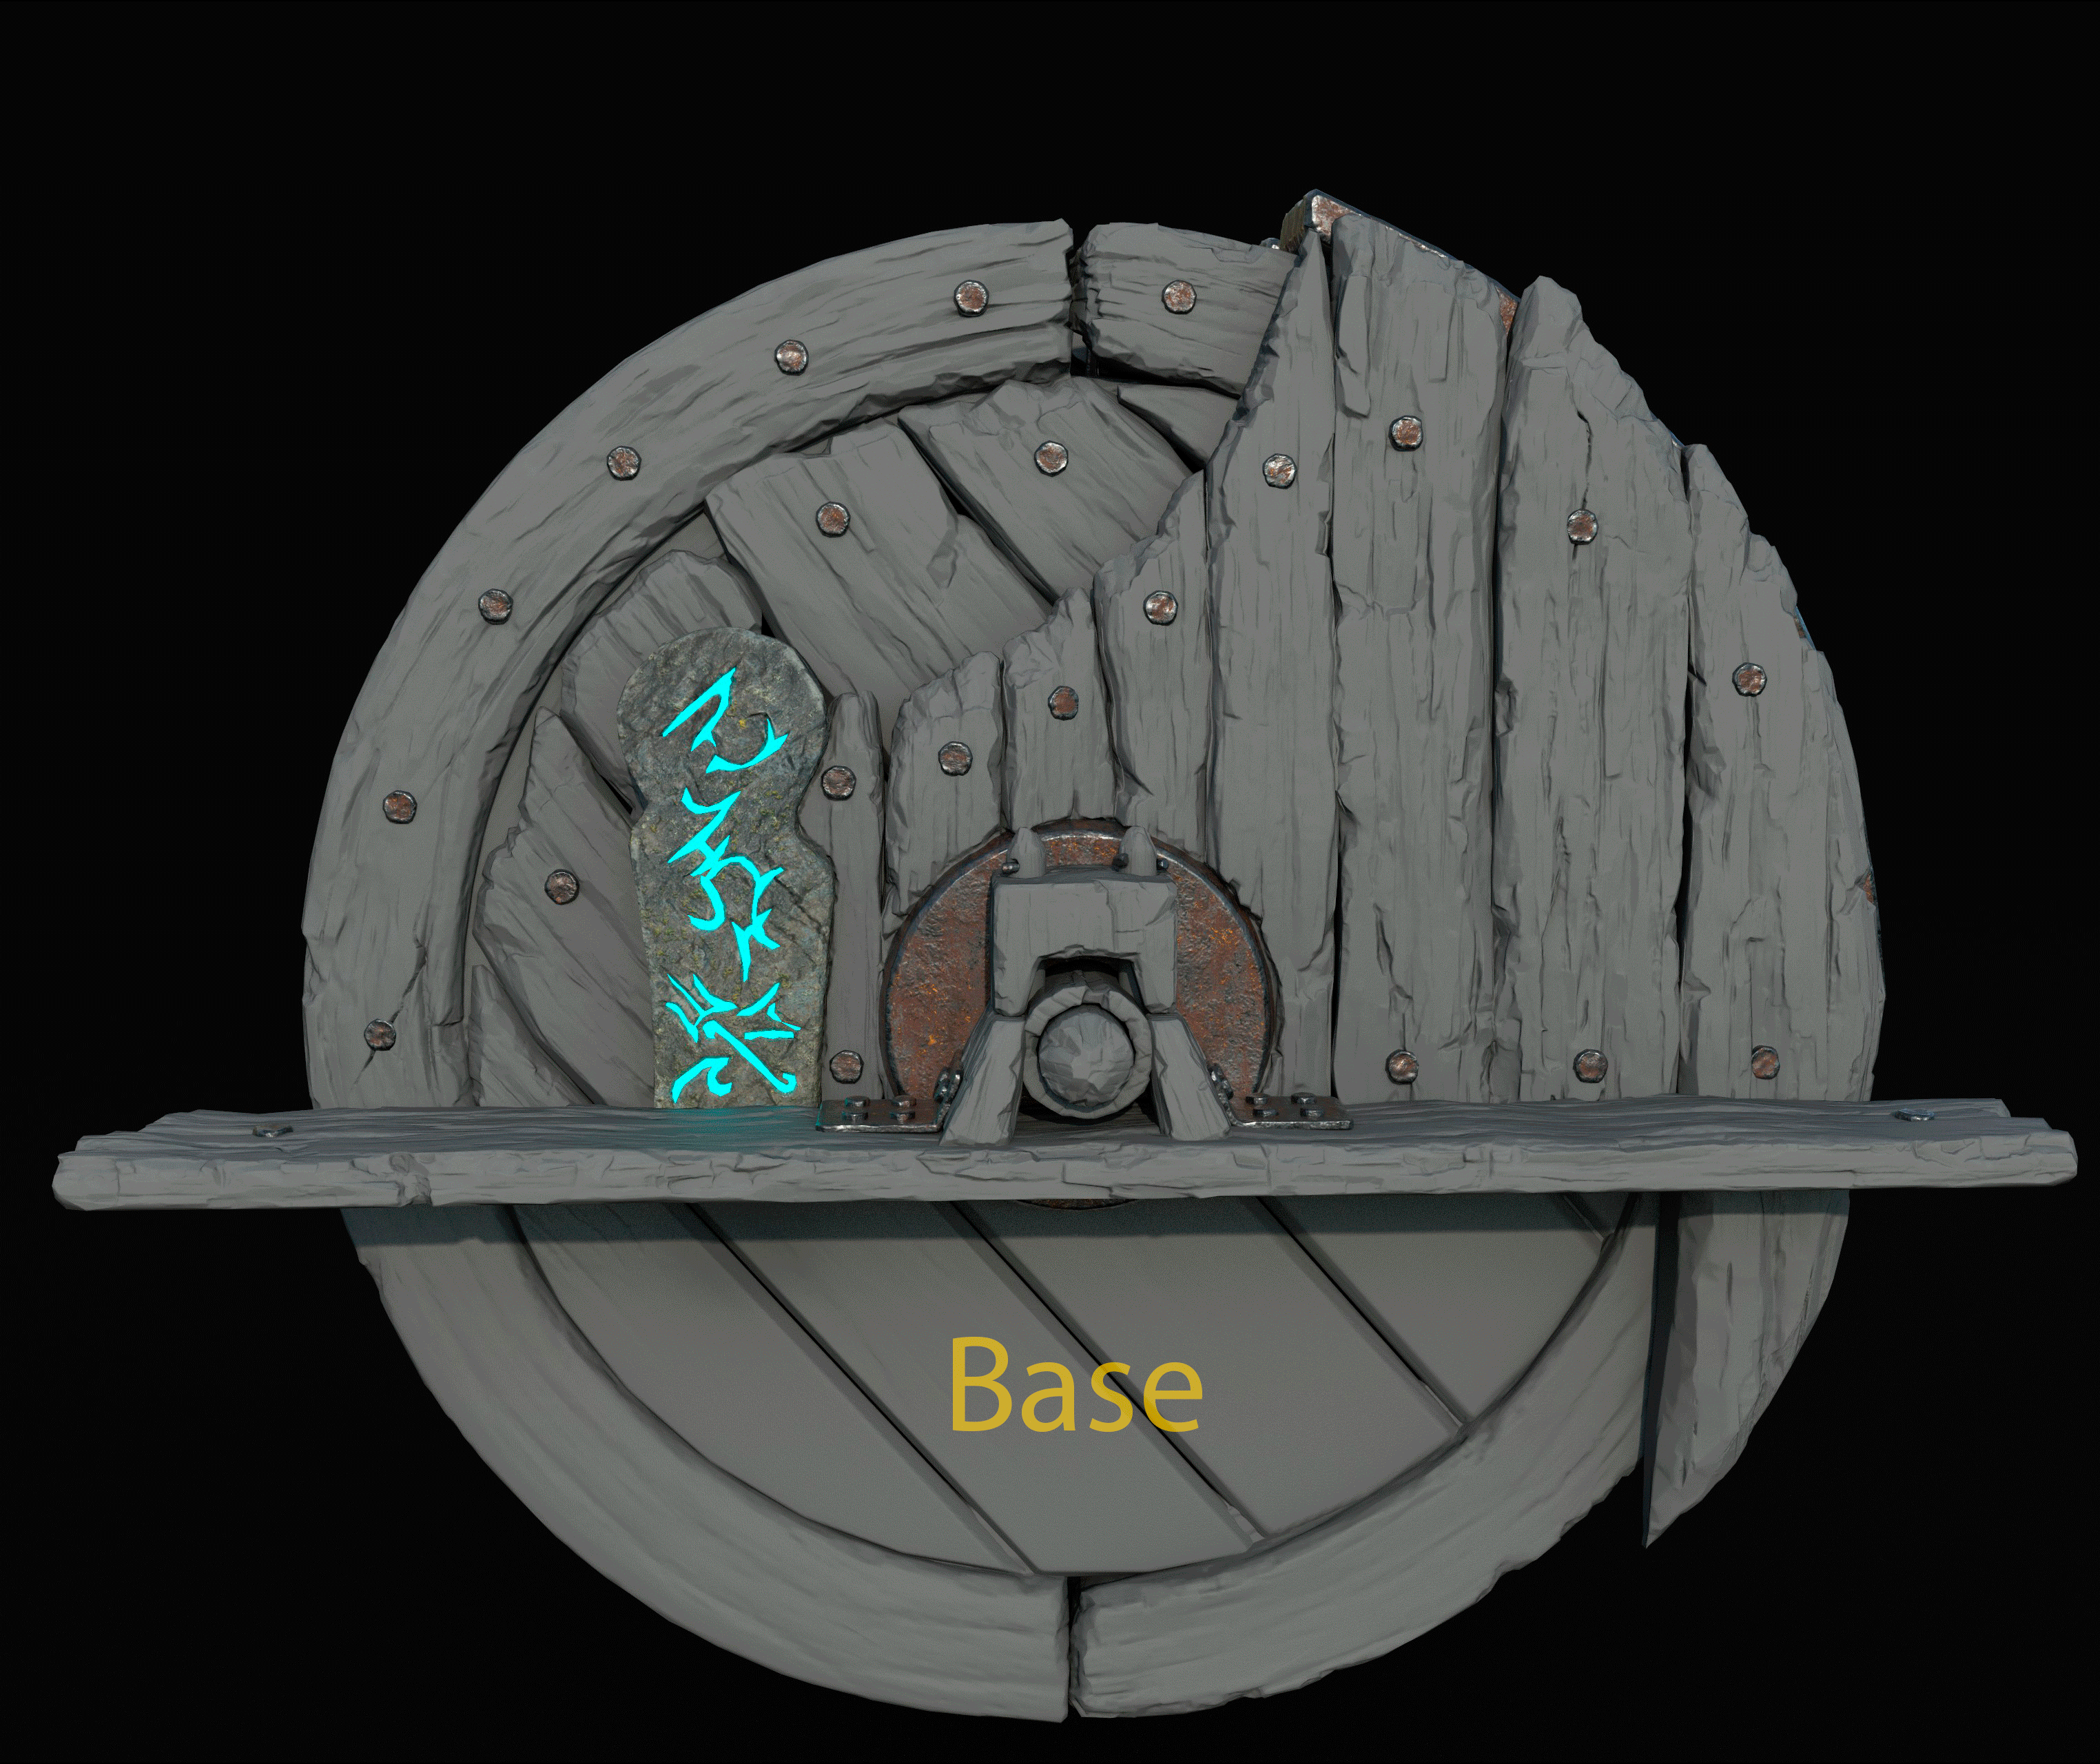
Here are the UVs of the model, in red the overlapped ones are like metal teeth (six unique and rest overlapped), in yellow an example of the better result for a wood texture later, and in pink one island which should have been a rectangle, but it’s not (my bad), but it’s a background piece and not too visible so it’s not a problem.
On the top right and left corners, I put the UVs with very low texel density, pieces almost impossible to see on game.
Finally, the asset has a Texel Density of 7 px/cm on a 4K texture, (the wheel has like 3,5 m diameter)

Bake
With this low poly which has the same silhouette as the high poly the bake runs without problems, the better idea is to put all models on shade smooth and it bakes perfectly fine on Marmoset Toolbag, only a few touches to the cage but easy.
In this case, I put different materials on each piece of the high poly to bake the IDs map (normally is a good idea for masks later) and baked two Ambient occlusion maps, one reading the groups of bake (which read only the AO for the piece itself), and another one ignoring groups (which reads all pieces together projecting AO of the pieces into another one) useful to combine with the another AO, or to use it on the texturing process for generators, masks, etc.
I baked later the rest of the common maps like Normal, Position, Obj. Normal, Thickness, AO, IDs, Cavity.
Texturing
For texturing, I used Substance Painter, imported all baked maps in Marmoset and the low poly model (but this version has all UVs on 1:1)
It’s a good idea to import a .fbx with the model duplicated, and its pieces exploded, to be able to paint on difficult areas if needed.
I will focus on the wood part more in-depth in this article because in this asset the metal and stone are very generic compared to the wood.
First I used the base layer material from Megascans to have a good/realistic pattern, Normal, Roughness, AO…
With levels, I tweaked the values of roughness a bit, then for color, I used HSL to remove the color leaving grayscale values to remap it with the filter Gradient, like this example, I tend to use first a gradient with very contrasting colors to see perfectly if all values have info and then duplicate the gradient or directly pick the colors from a PureRef picture or something like that, this technique is very easy and very powerful for color variation, and you can mask the result wherever you need the changes.
I used this a lot in layers like dirt, paint, moss, etc, and then mask it to have this variation on places that you want.
Layers like paint, added to the base wood, has a bit of height, and a flat normal (blend mode: normal 75% in this case), to avoid that the paint layer has the same normal information as the wood below, because the paint fills the grain of the wood and make it more “flat” or “smooth”.
In the GIF example I show you the whole process of color, but these layers have roughness and sometimes height variations too.


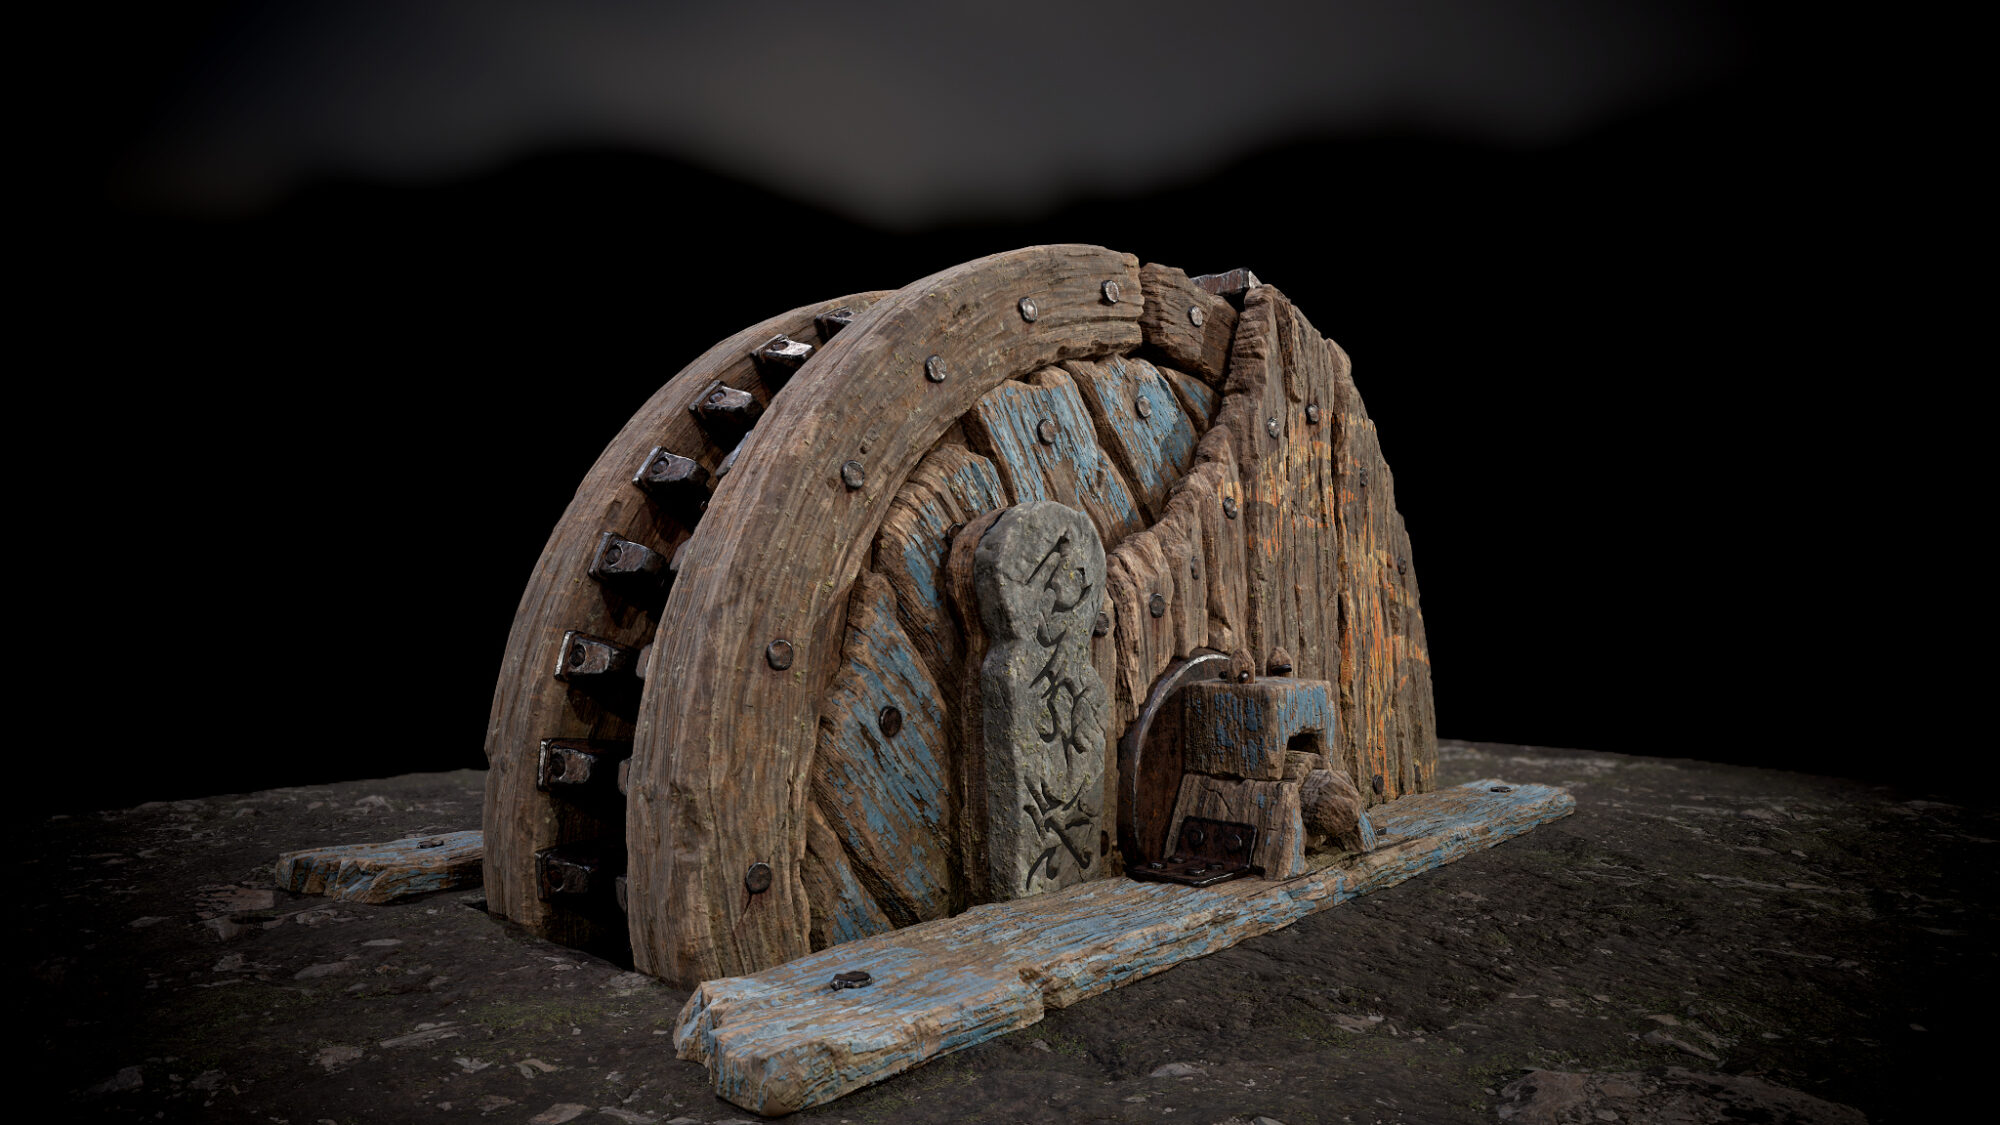
Render
I used to update my old renders of the asset Marmoset Toolbag 3, on this side I haven’t too much to say, for me, this part is music on my ears, tweak a lot and play with lights and values to achive the best result possible, normally I start with a three-point light setup, but after that, I move the lights or add new ones, etc.
Dismissed Renders and Final Renders:
Final thoughts
I’m very happy with the end result, but each time I look at it, I want to do a new change or repair something, I think that is normal, and I try to save these ideas and mistakes learned to the next asset I make and close the cycle just for health.
I hope that this article will be useful, please remember that all these steps here work for me for the moment, but there are a lot of different ways to achieve the same result, just explore and take the more comfortable path for yourself.
I feel very fortunate and grateful for being able to contribute something to the community from which I have learned and learn so many things every day.
Many thanks to Games Artist for this opportunity, it has been a pleasure collaborating with you. I wish you the best.
Until next time!
Read more articles
You might also like these articles.