Kyrgyzstan Yurt

Introduction
Hello world, my name is Max Kutsenko, I'm a texture artist from a little country called Estonia currently working at Ubisoft Barcelona.

Project
First of all, I would like to thank you for inviting me again. I am really happy to share with you my workflows and explain how I built this Kyrgyzstan yurt diorama. You know I am super fascinated by all the procedural technology, and having obtained a good grasp of Substance 3D Designer, this year I am focusing on learning Houdini.
So, making a yurt presented a great opportunity to dive into this magical software and experiment with some Vellum cloth simulations.
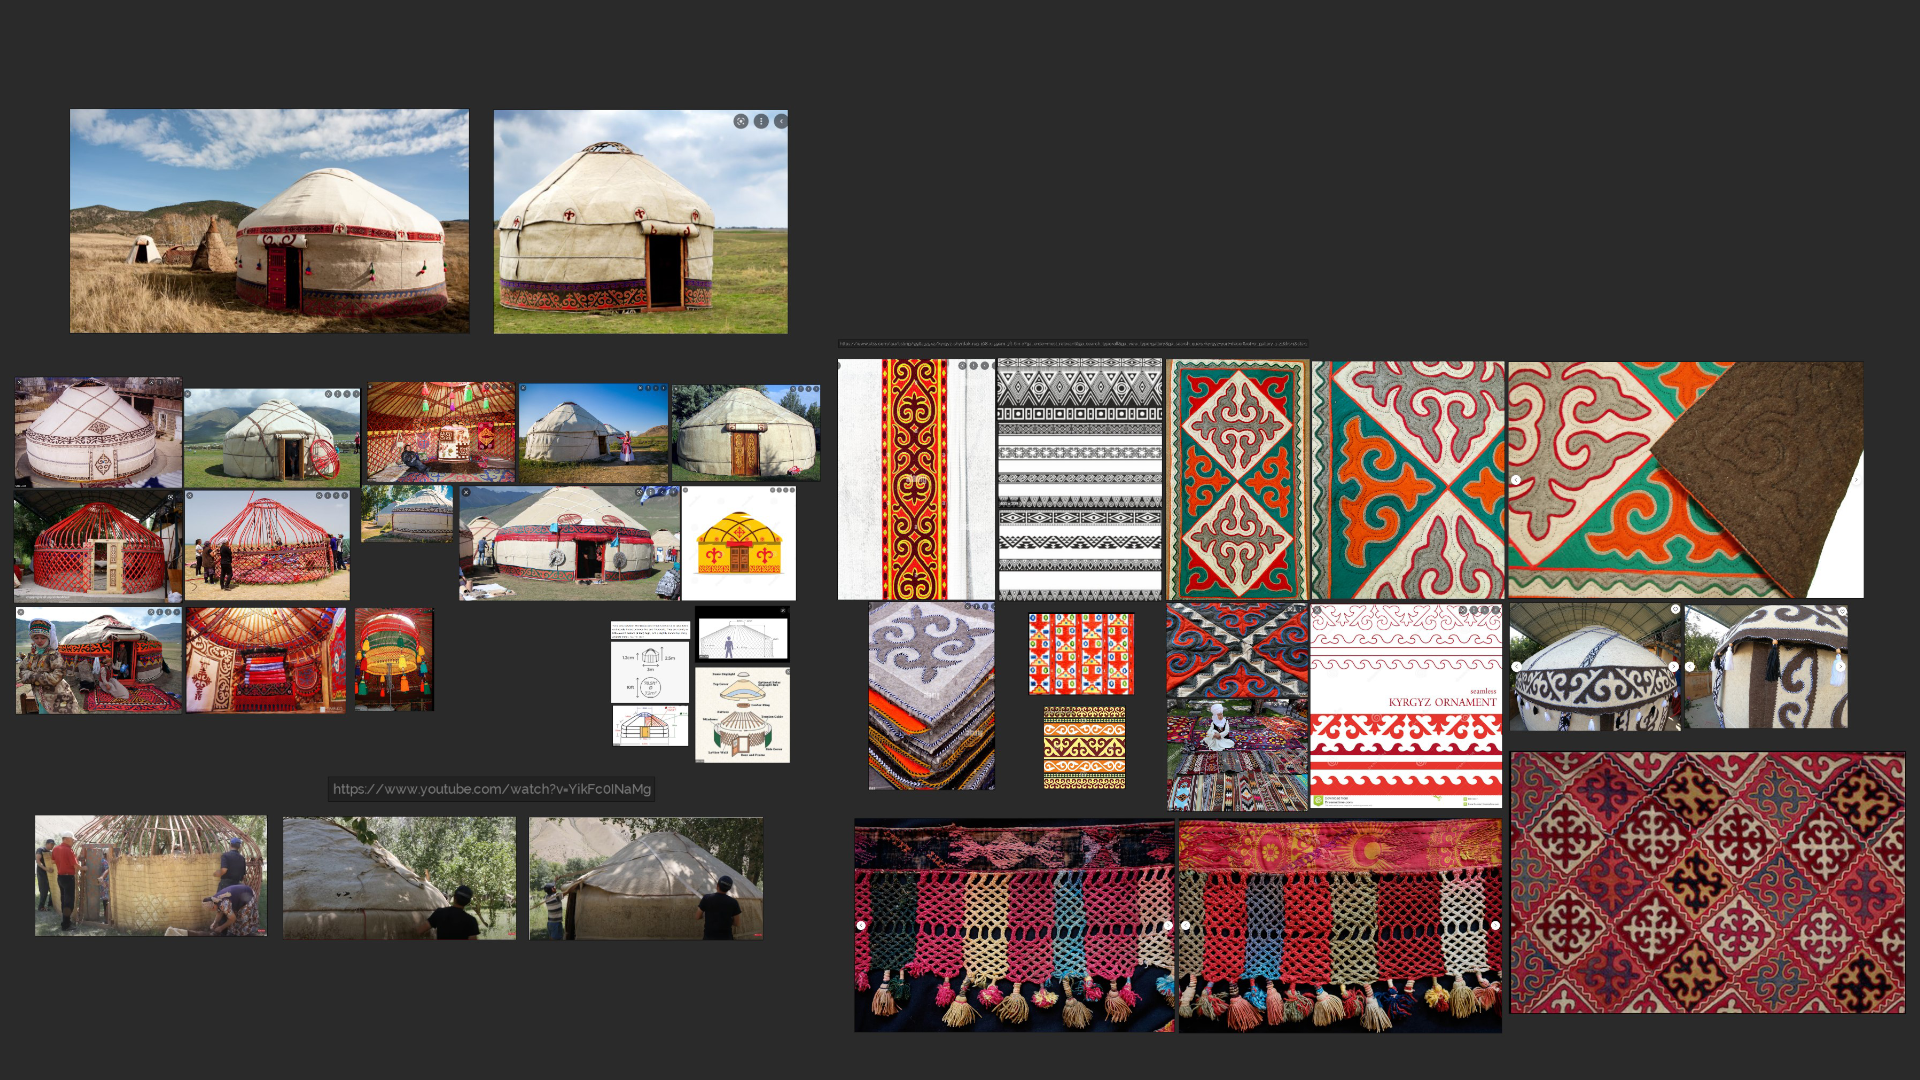
Reference & Inspiration
Truth be told, I discovered this yurt by accident. It appeared one morning as a Windows desktop wallpaper on my PC. I have this awesome software installed called “Bing Wallpaper,” and it loads a different image from around the world onto my desktop every day.
I highly recommend getting it for artists because the amount of inspirational content I have discovered thanks to this feature is mind-blowing. Anyway, when I first saw the yurt, I instantly fell in love with its colorful and intricate patterns, as well as its rough-looking felt cloth wrapped around the base.
I immediately said to myself, “Wouldn’t it be cool to recreate it in 3D?” It was something fresh that I had not seen on Artstation, and moreover, it would allow me to try out Houdini’s Vellum cloth simulation for the first time.
Before we jump into the creation process, I want to give you a small yurt summary to understand what we are dealing with here. Yurts are one of the most essential parts of Kyrgyz culture and are more than just houses.
They represent the family, the earth, and the universe, and cover everything from birth to death. Yurts hold much of Kyrgyz culture, from important rituals and ceremonies to craftsmanship and traditional artistry.
So to kick things off, I conducted extensive research on how Kyrgyz people assemble the yurts and how the wool felts and patterns are created.
I watched a lot of videos, gathered a wide variety of images, and eventually compiled a PureRef reference board to keep it all in one place.
Blockout & Modelling
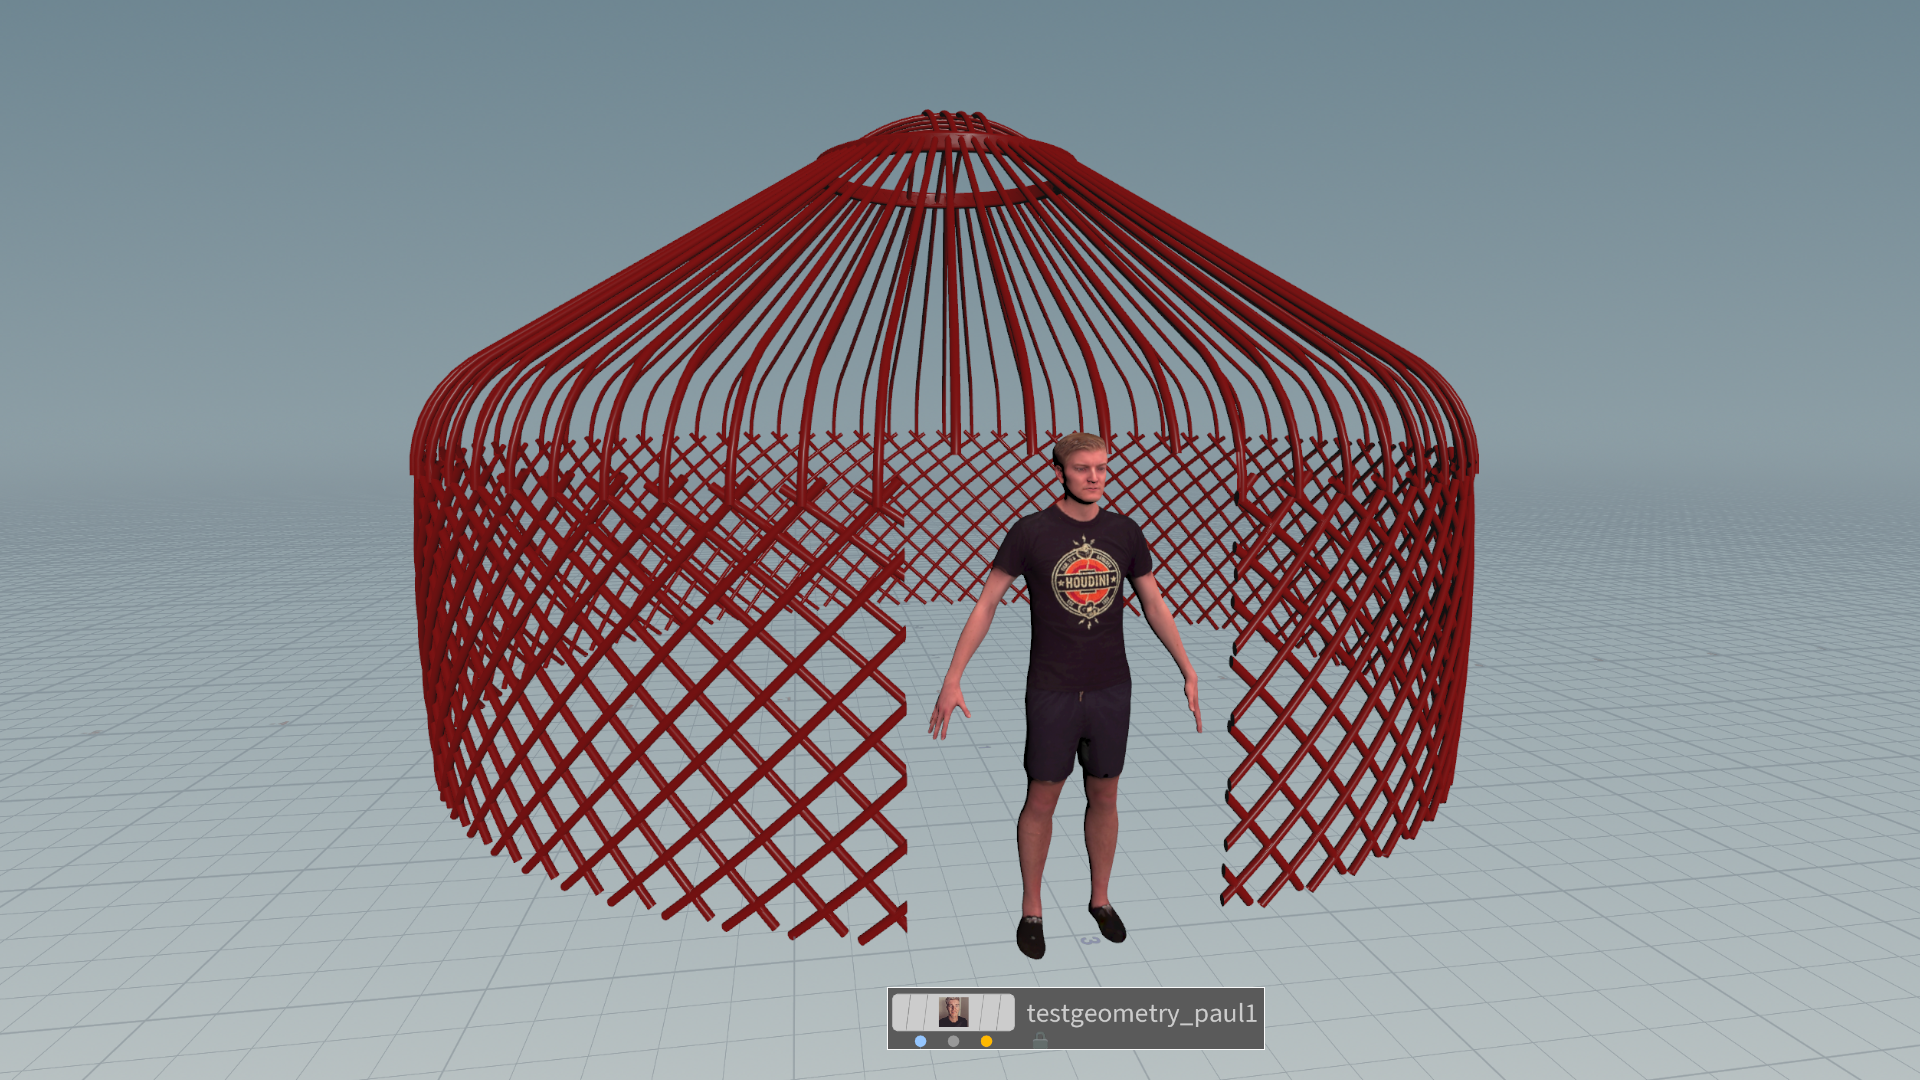
I approached the creation of the yurt in the same way it would be built in real life. First, I modeled a wooden base structure around which the felt fabric would be wrapped at a later stage. In Houdini, I created a cylindrical beam, rotated it 45 degrees, and scattered it in a circular shape.
Then, I repeated the process in the opposite direction, which created a crisscross lattice effect for the walls. The Kyrgyz people traditionally tie the beams with a rope, but I skipped this step, knowing that the structure itself would not be visible in the final render.
I kept it really basic, only using it as a collision mesh for the felt simulation. Take note of how I included a person for scale reference to maintain realism with real-life yurt dimensions. So, thanks to Paul for joining me on this project 🙂
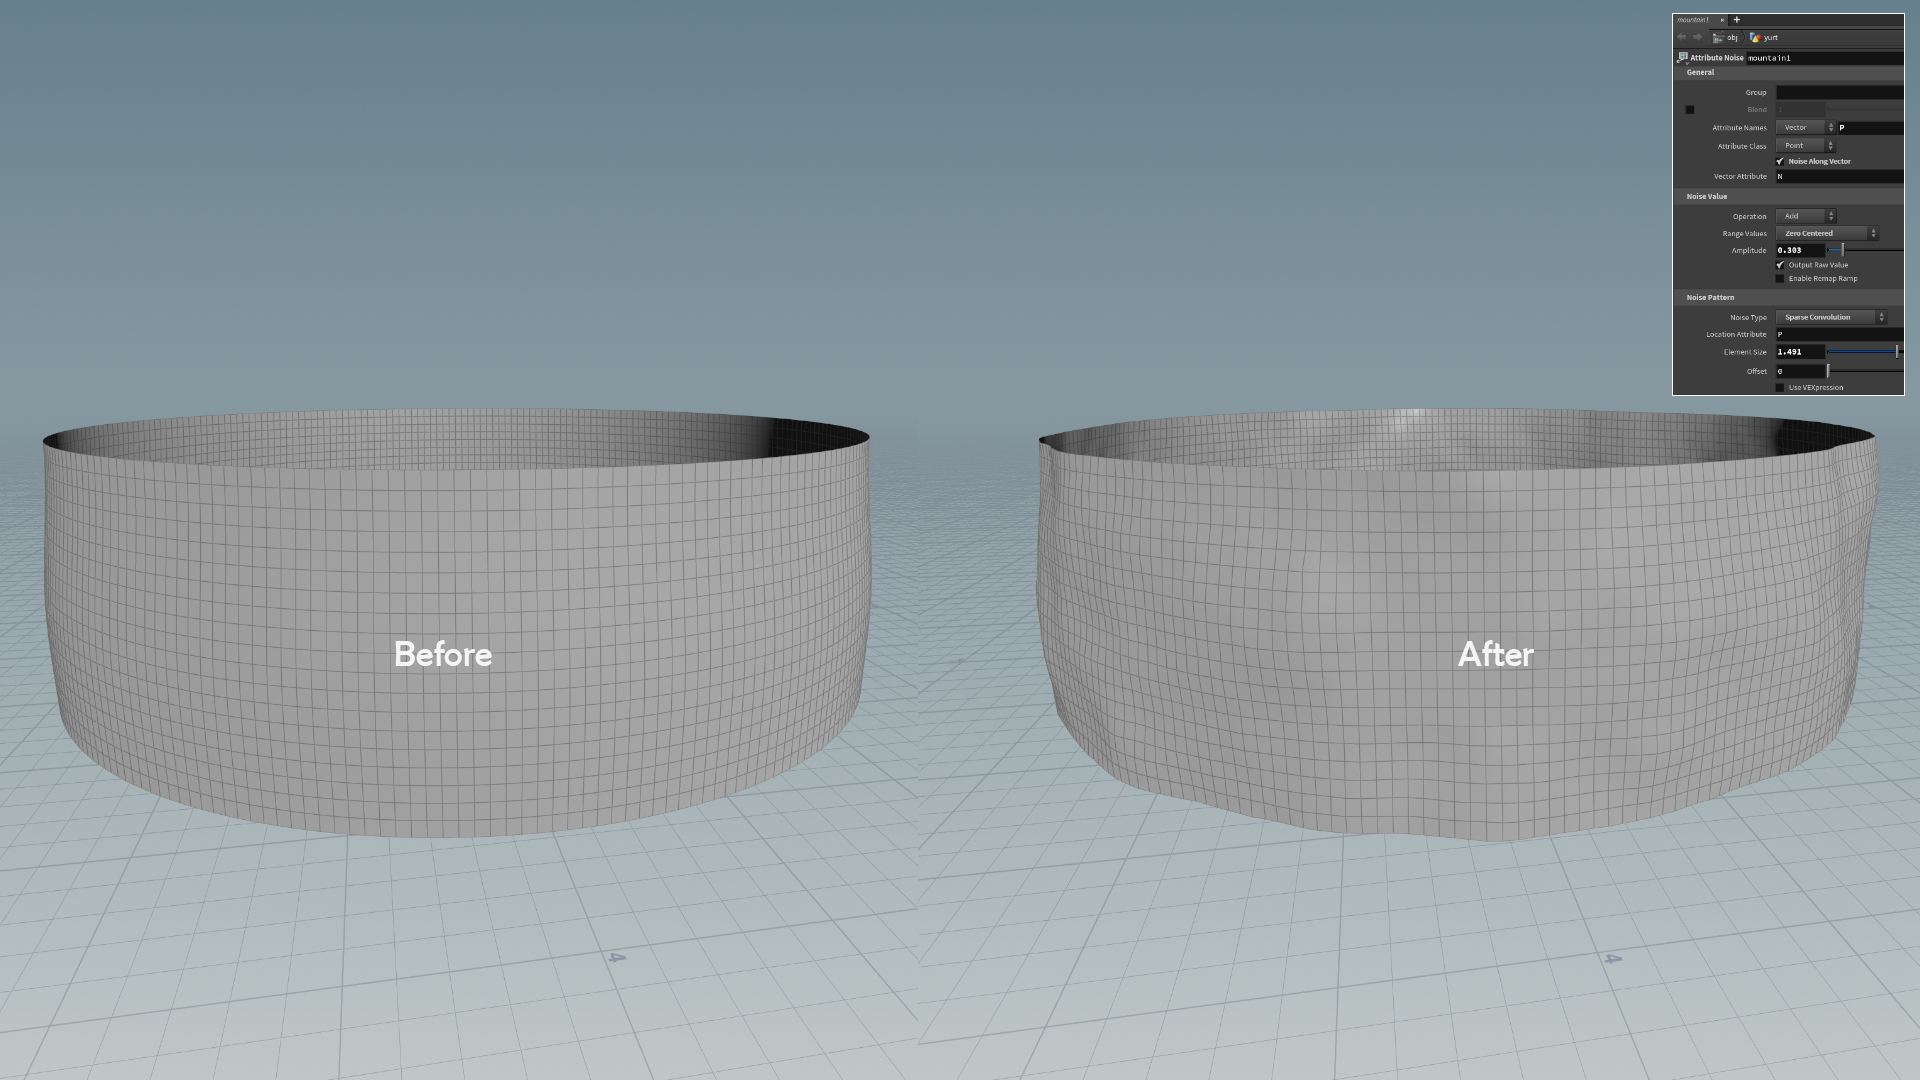
To cover the walls with felt cloth, I created a basic cylinder and applied a “Mountain” node, which displaces the mesh according to the chosen noise type.
Therefore, I opted for “Sparse convolution” as it introduced appealing imperfections to the walls, similar to those in my references.
Afterward, I removed the door from the main mesh and added thickness using the “Thicken” function.
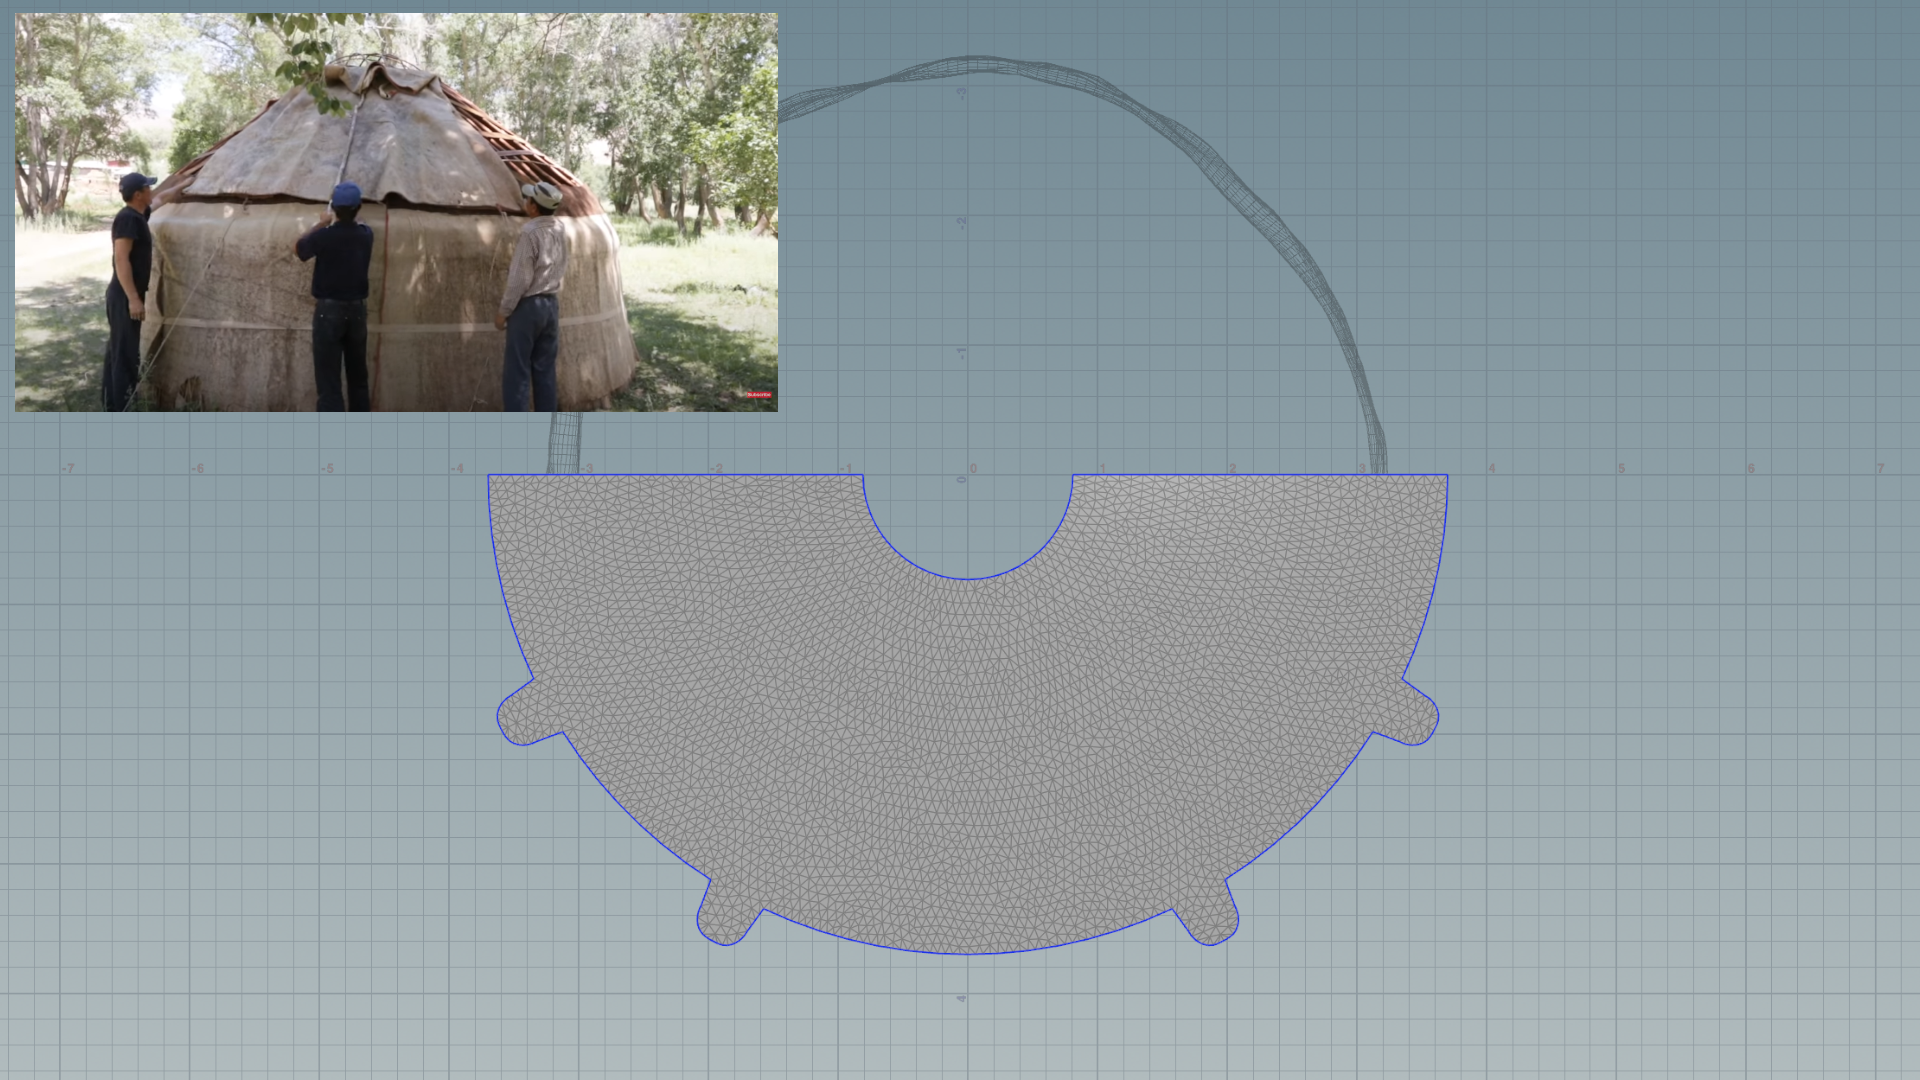
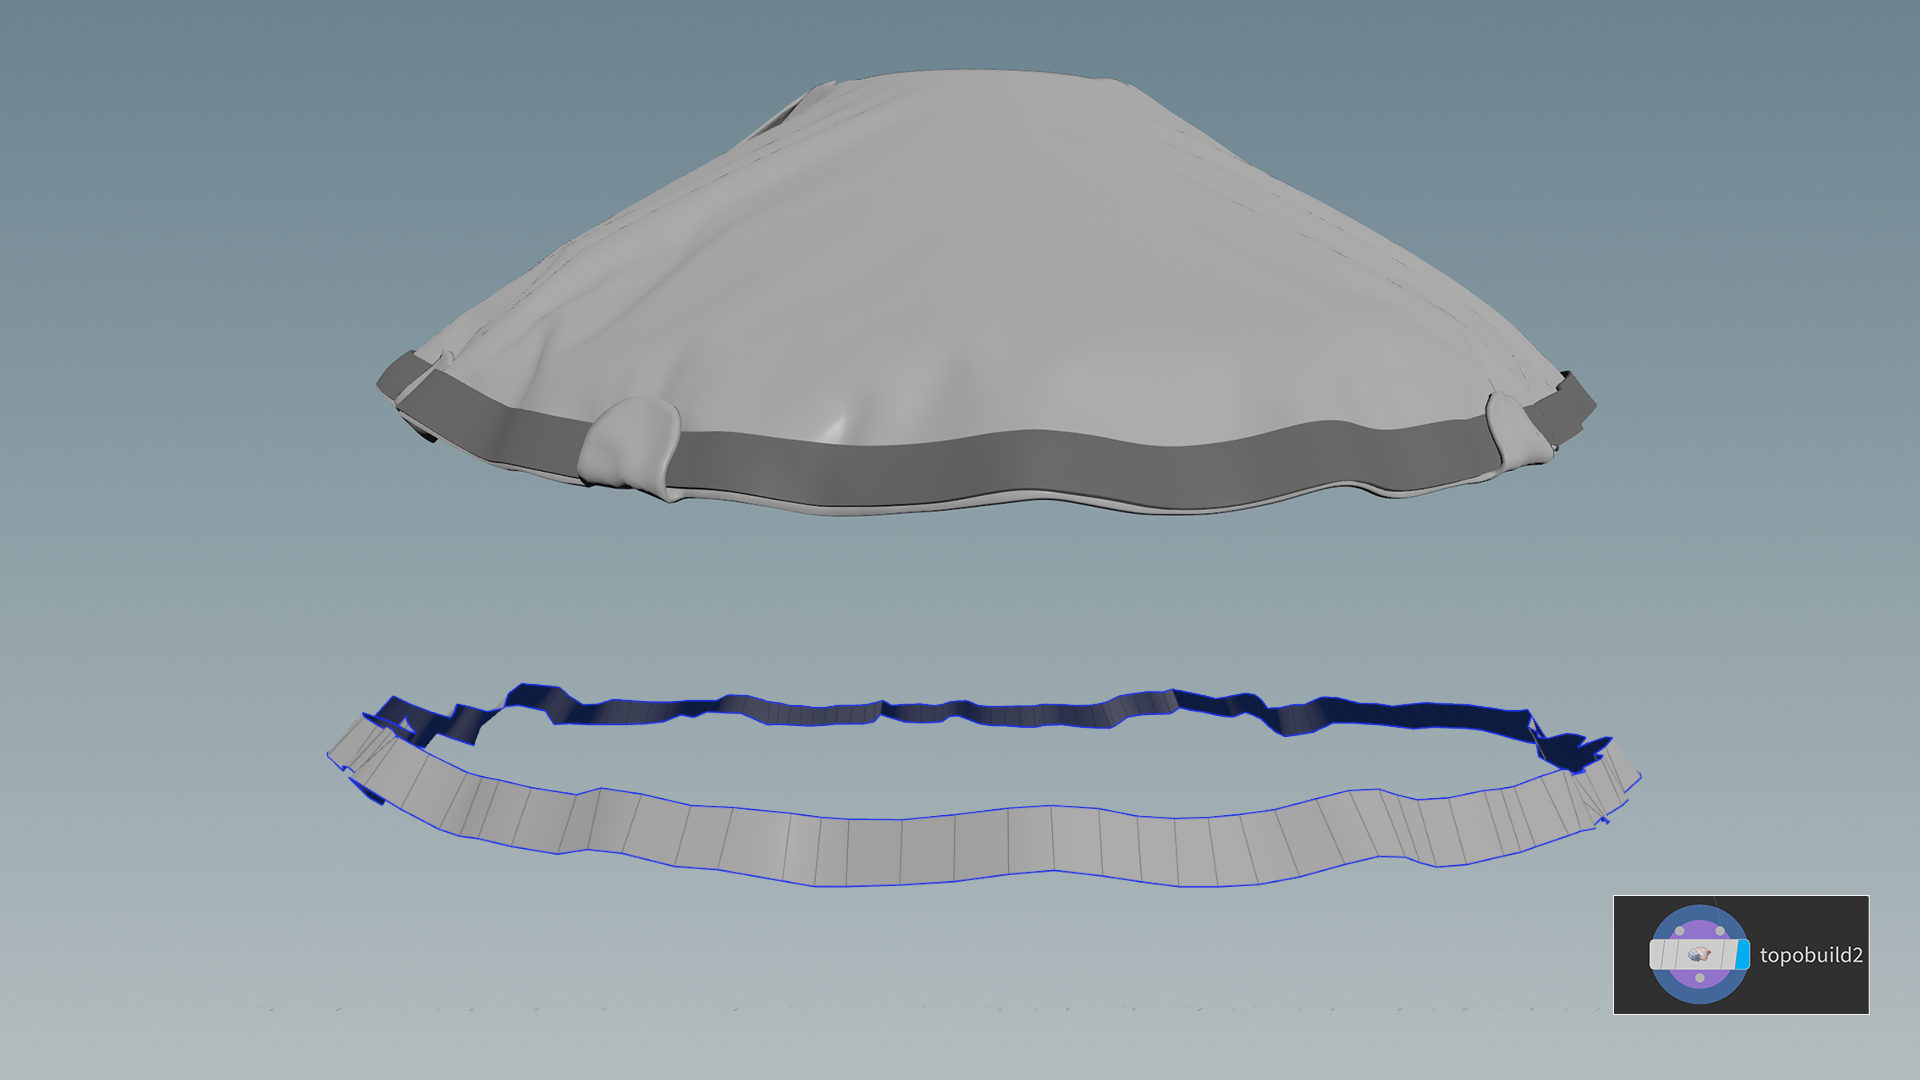
The felt cloth on the roof was more complicated to make and required some serious planning.
After watching a video, I realized there are two semicircular cloth pieces that are pulled up the roof with sticks and then fastened with strings or ropes to hold everything in place.
Taking this into account, I created a semicircular flat plane, added subdivisions to it, and ran a Vellum cloth simulation. I set it up in a way that the piece falls down on top of the roof beams, resulting in realistic-looking folds upon landing.
I refined the folds using the “Vellum Brush,” which allows you to select brushes with various cool effects and simulate the cloth in real-time by dragging your mouse cursor over the mesh.
It’s super fun! As you can see in the video, I settled on the “Drag” brush and dragged the cloth left and right until it produced some decent-looking folds.
You can also pin the mesh down (little blue squares) anywhere so it doesn’t move when you run a simulation. This feature came in handy when I wanted to keep those four loose pocket pieces (ribbon holders) in place.
Once I was satisfied with the result, I added some thickness to the felt cloth and proceeded to repeat the same Vellum simulation for other pieces of the roof, as well as the strings.

To create a ribbon at the edge of the roof, I used Houdini’s retopology feature called “TopoBuild.”
With this feature, you can draw quads on top of the surface. Once I finished drawing, I subdivided the mesh and gave it some thickness, just like before.
To create the ropes that are wrapped around the yurt, I followed these steps.
First, I made a rope using a combination of two sweep nodes, as you will see in the video. I really like how it is super easy to achieve a nice-looking result with just a few adjustments.
Then, I isolated the edges of the mesh where I wanted the ropes to run along and used “Pathdeform” to make my previously made rope stretch along the curvature of the edges.
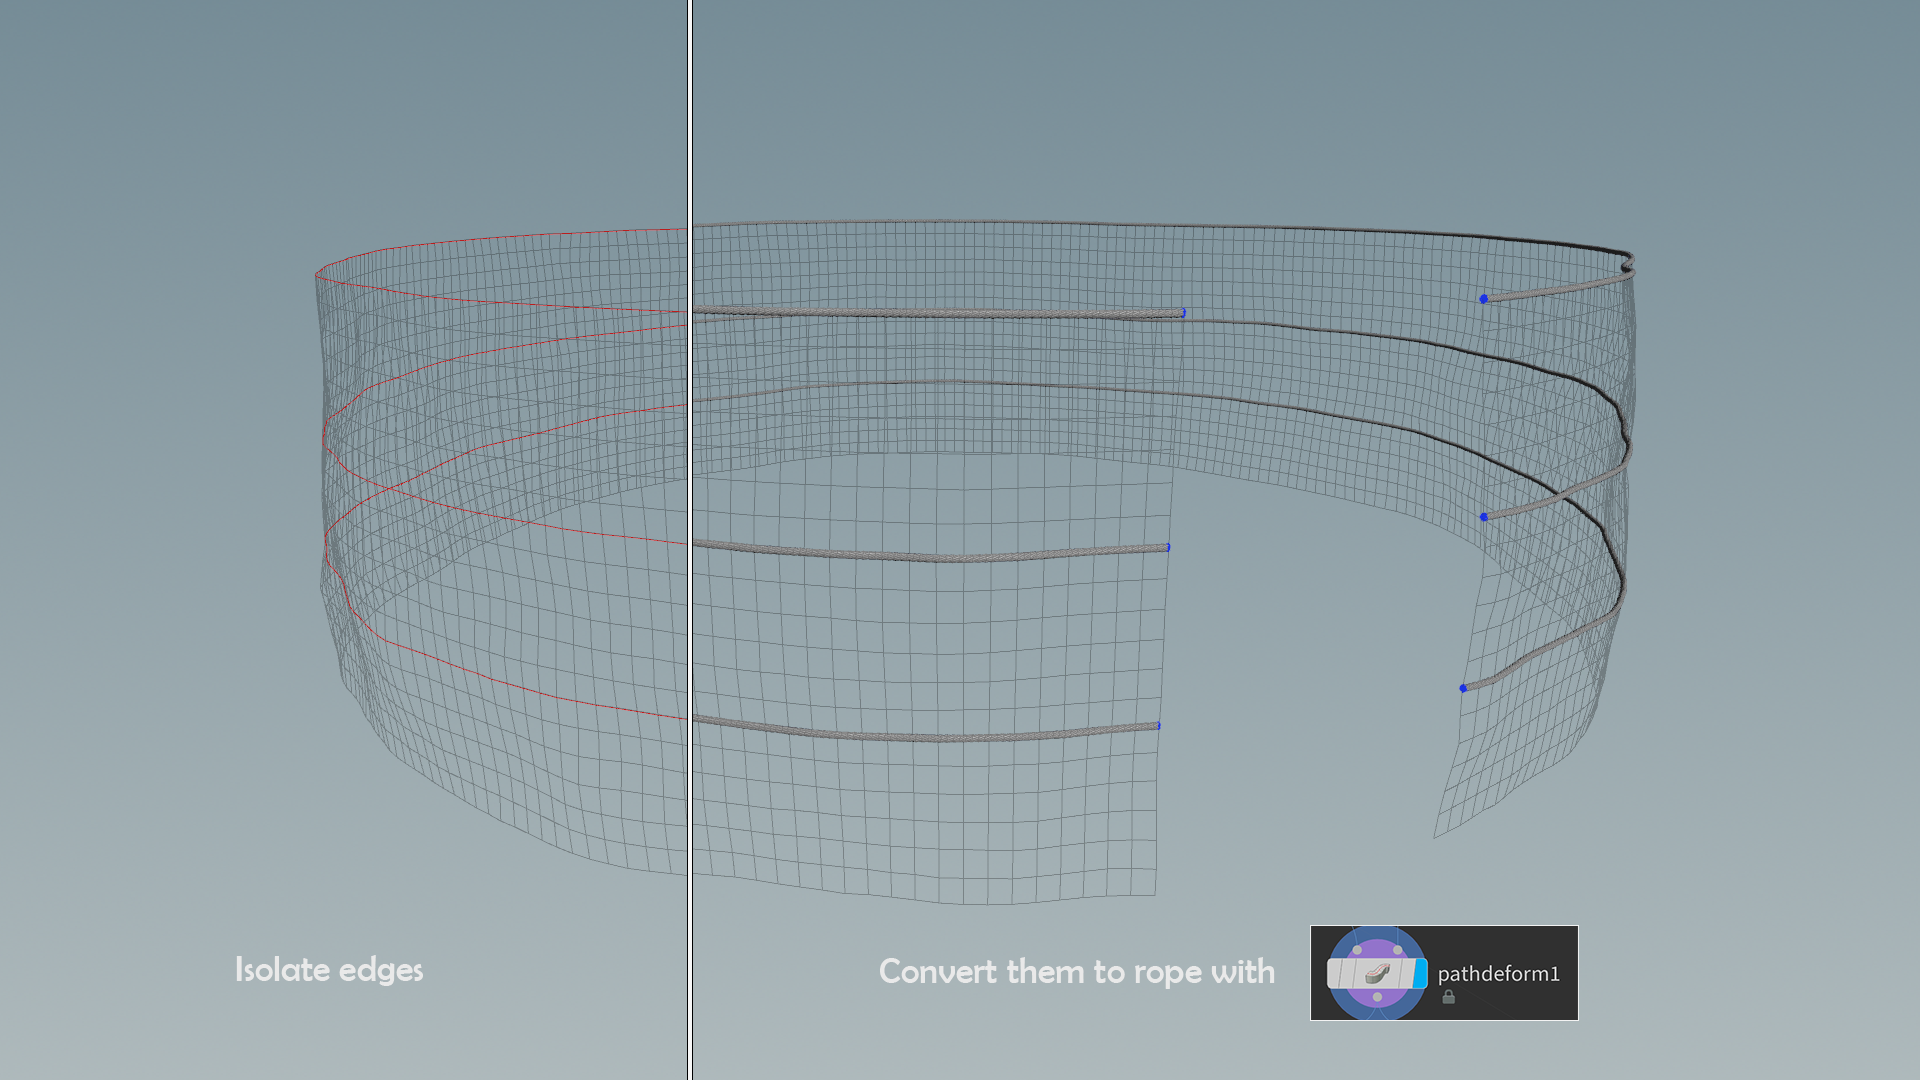
To finalize the ropes, I moved some parts up and down using the soft select tool to make them appear more imperfect and organic.
For creating the bristles hanging down from the ropes, I decided to utilize the Vellum simulation once again. As depicted in the video, I scatter a multitude of points within the circle and assign a line to each point using the “copy to points” function.
Each line possesses a distinct length due to the “attribrandomize” node.
Then, I apply a jitter pass to slightly displace the points and run a Vellum hair simulation, placing constraints on the points that come into contact with the ground. This ensures that all the points at the bottom are somewhat glued to the floor, preventing the hair from flying away during the simulation.
The final simulation yields a pleasingly chaotic sensation to the hair, precisely what I intended. To conclude the process, I add thickness to the bristles.
I rotated it upside down and squashed the vertices on top with a soft selection to make it look like the strings were pulled together under tension.
Next, I used some primitive shapes like spheres and multiplied them to form a cord that will hold the bristles together.
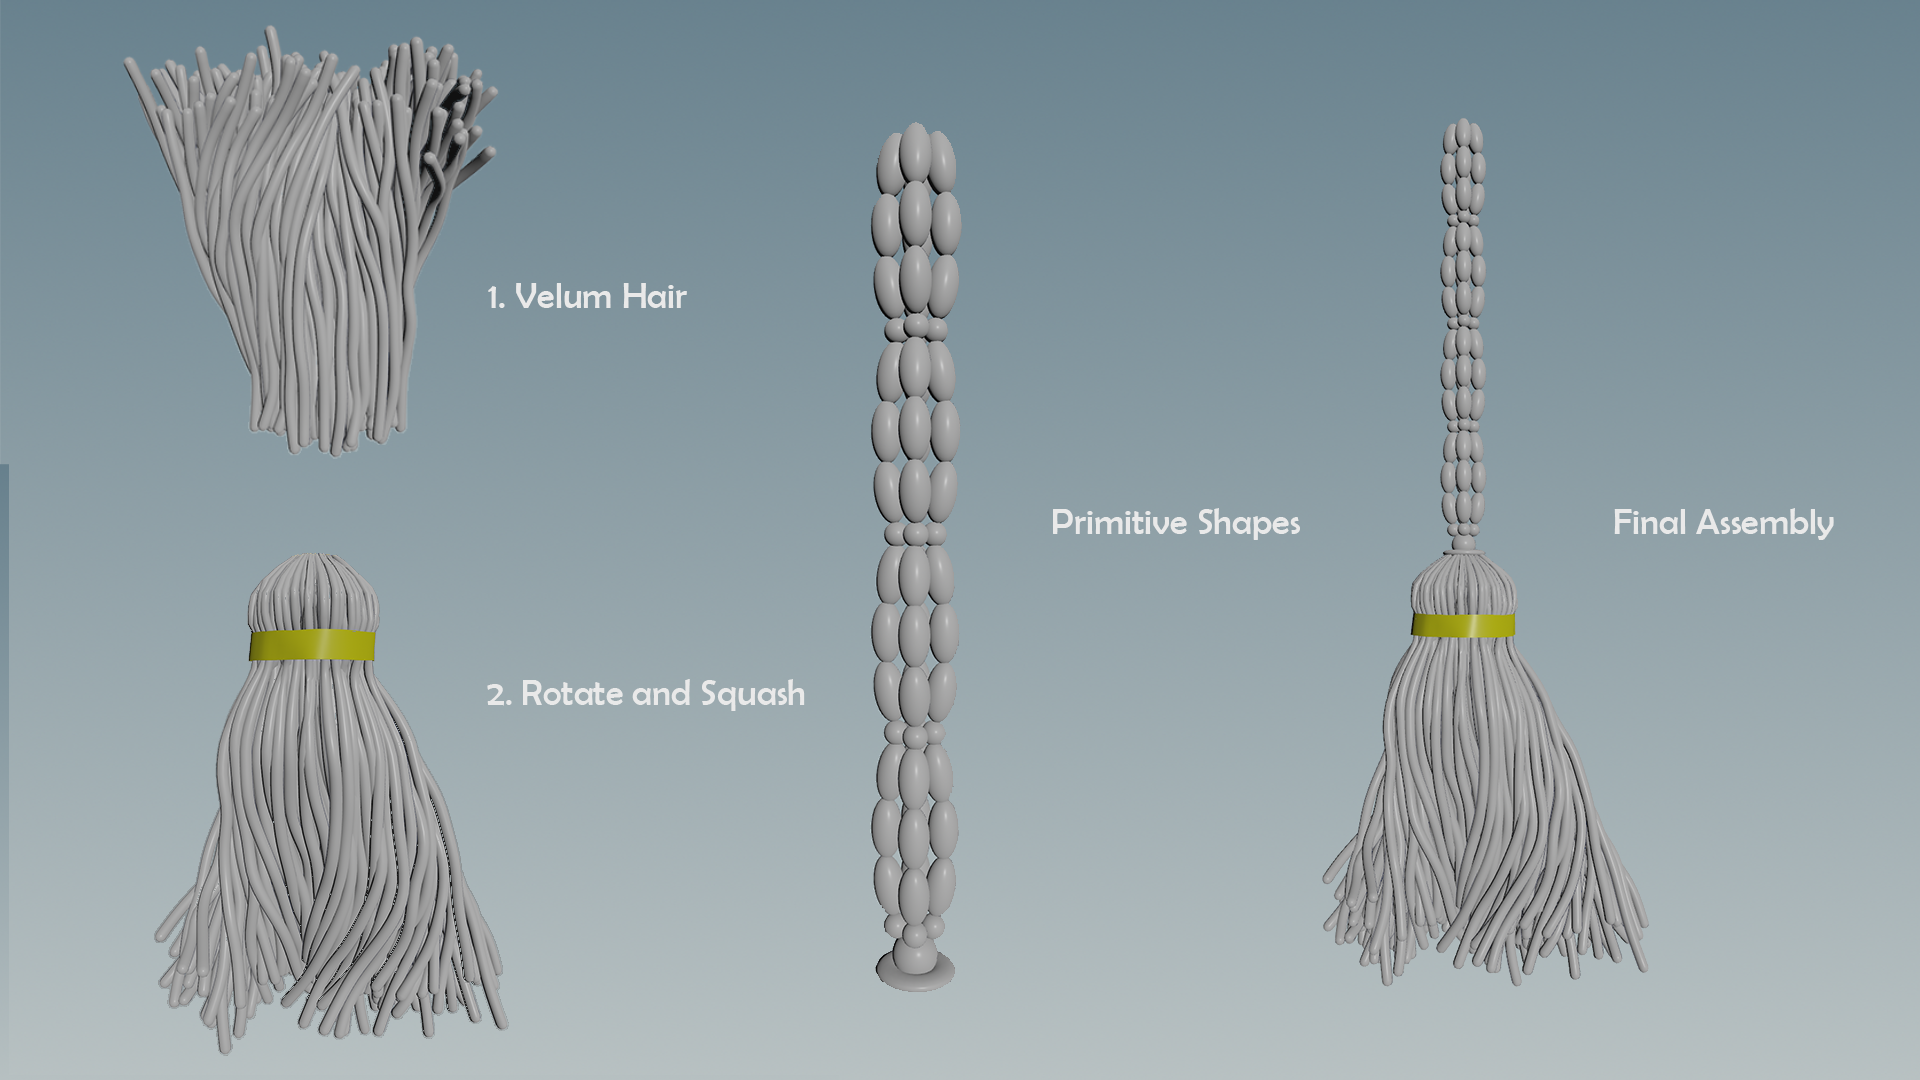
Once it was assembled, I hand-placed those bristles along the path of the deformed rope previously created and moved on to the texture creation process.
Texturing & Substance
Firstly, I decided to create a base tileable felt material. Once it’s ready, I will be able to layer in those colorful Kyrgyz patterns.
The yurt felt itself is quite unique, and there is an elaborate process involving stripping down sheep’s fur, condensing and pressing it together, and finally cutting the pieces out.
So I jumped into Substance 3D Designer and built my main shapes, starting as always with a height map creation.
As you can see from my graph snippet, I am using quite a few variations of blurs and warps to shift my moisture noise around and create a lot of soft surface movement at different scales, mimicking how the wool would be pressed together and have some undulations on the surface.
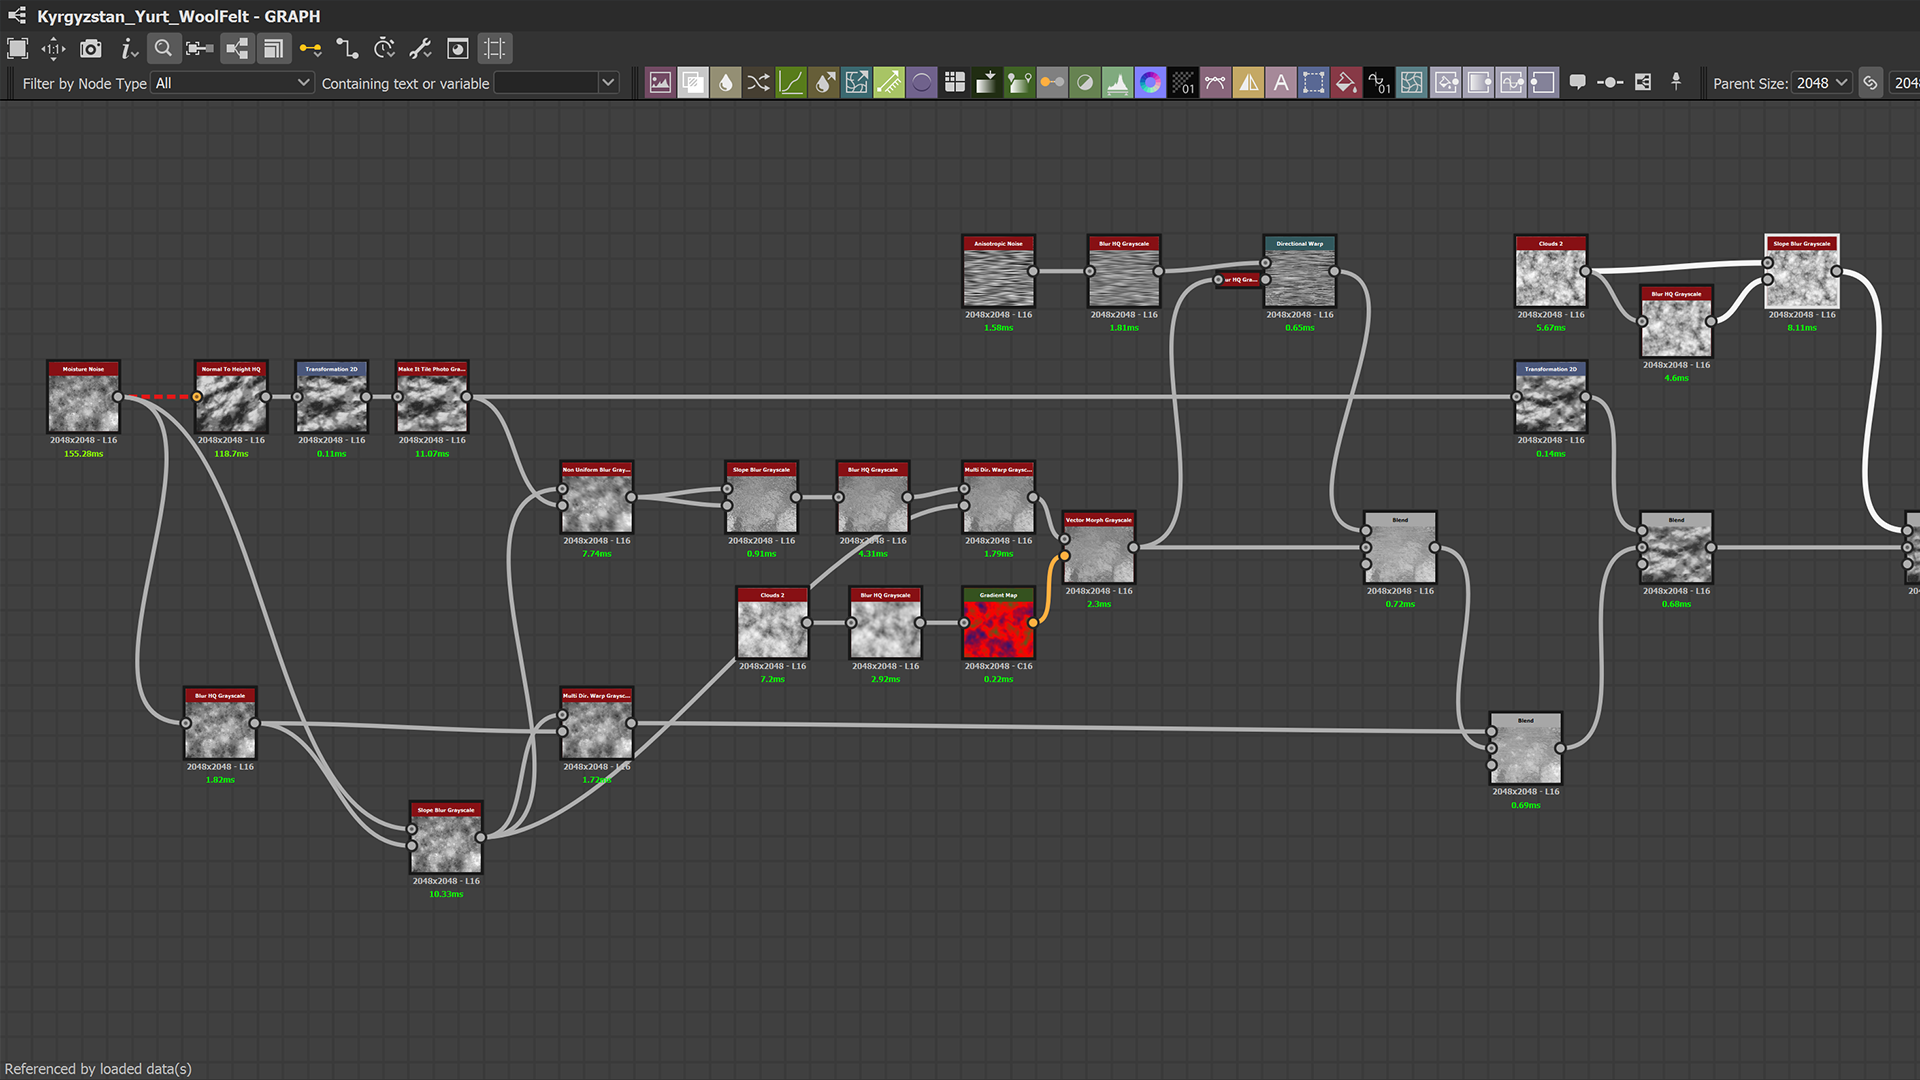
In my opinion, the key to truly selling the effect of wool felt lies in the normal map. I made a few manipulations with it, and I believe it helped enhance the material. I took a height frequency noise like “Moisture,” converted it to a normal map, and applied “Multi Directional Warp Color” to it.
This pushed my normal map into four different directions, thereby disrupting the normal continuity and creating a complex interplay when the light hits the surface.
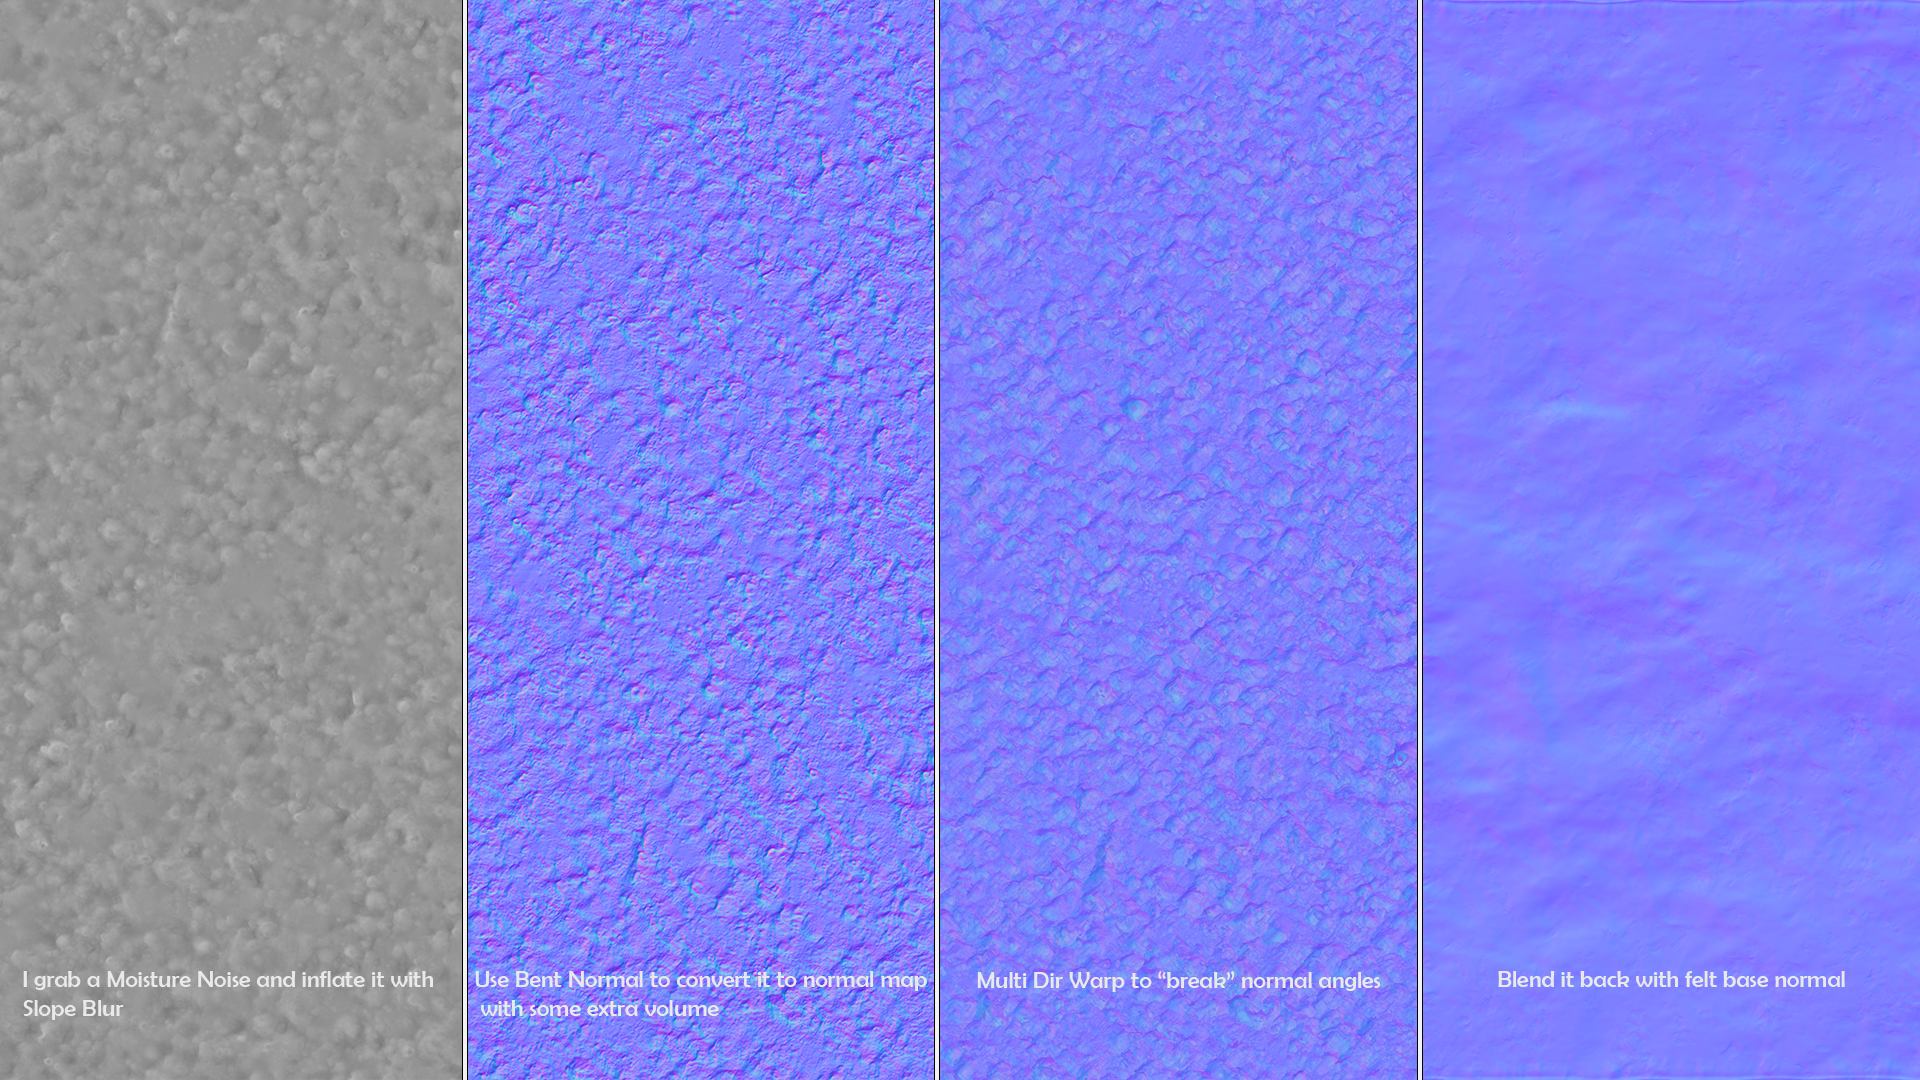
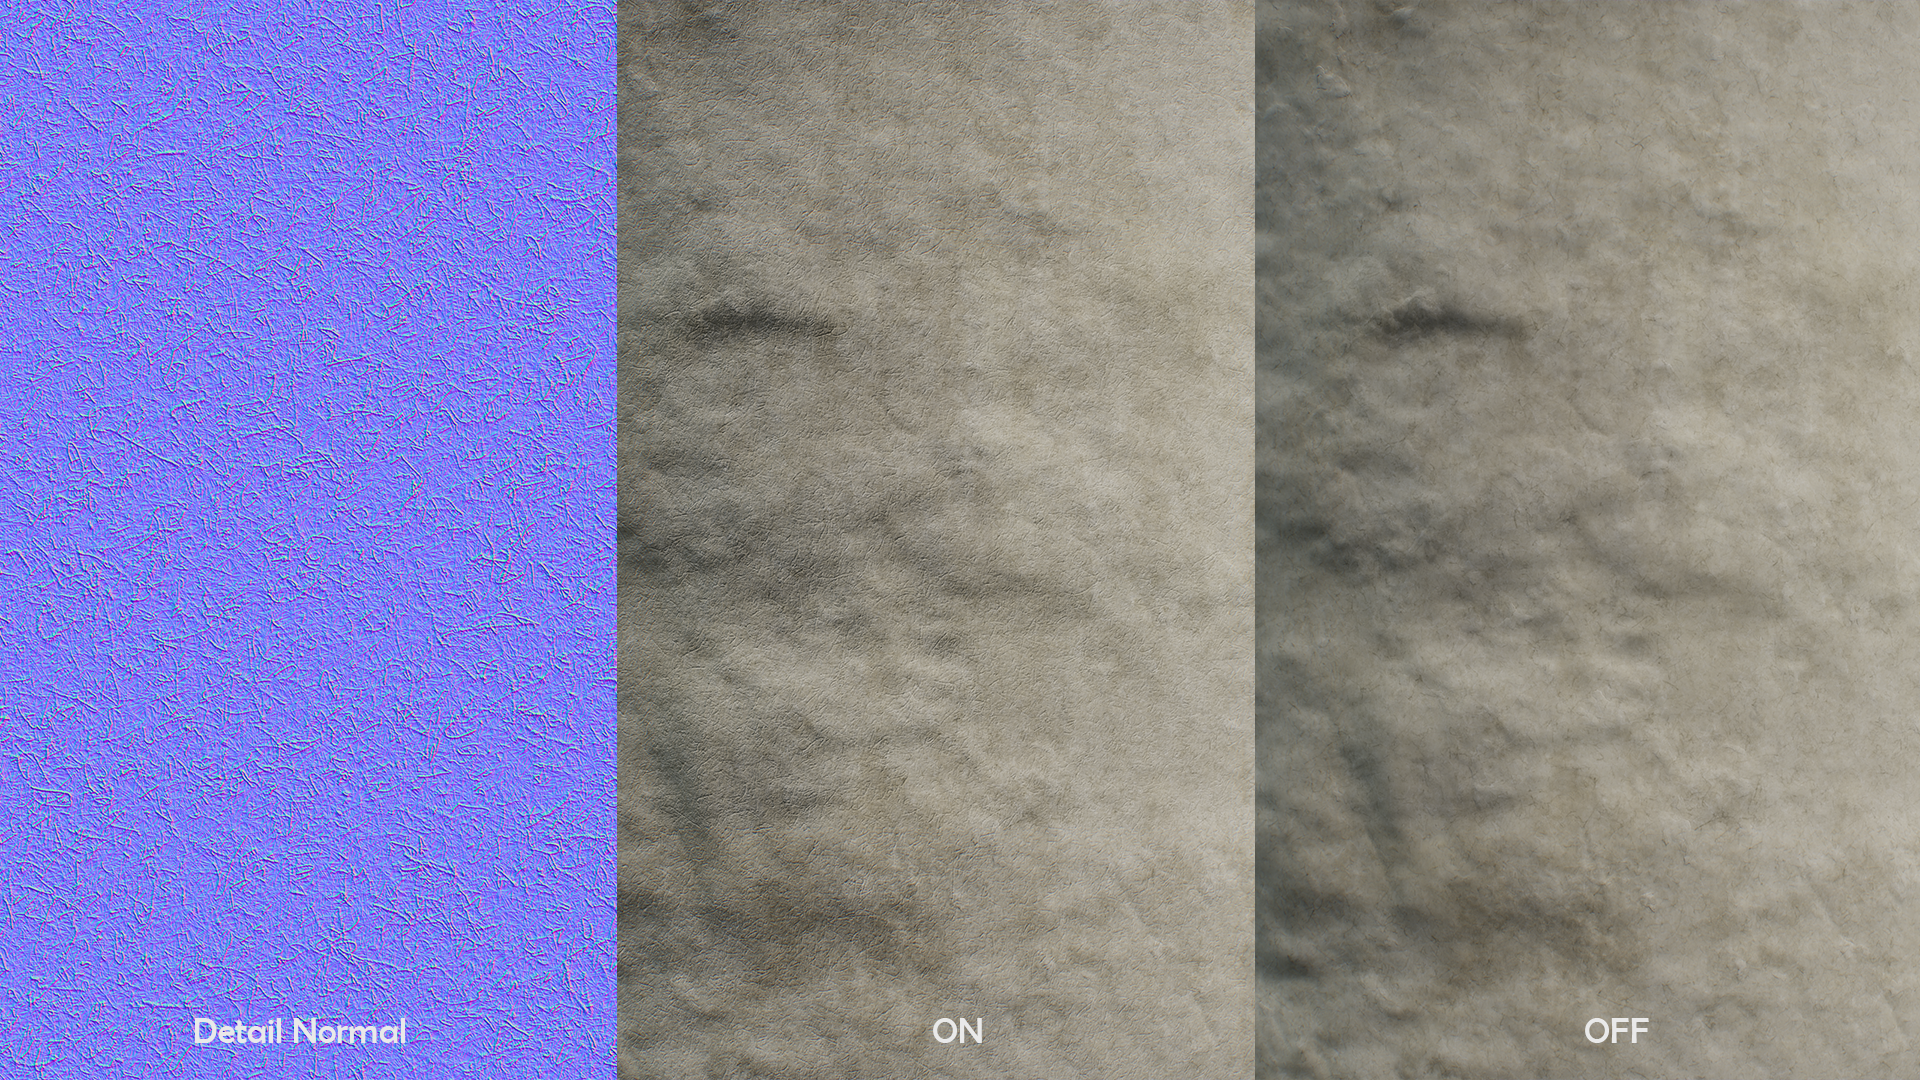
On top of that, I made use of a detail normal map, adding a layer of scanned felt wool hair from textures.com.
The albedo work was fairly simple. I used a creamy, uniform color and overlayed some grungy noises to make it look aged and dirty. I reused a scan of wool hair to include this information in the color. These tiny hairs are not that visible from a distance, but they do create a fuzzy and coarse feeling to the texture.
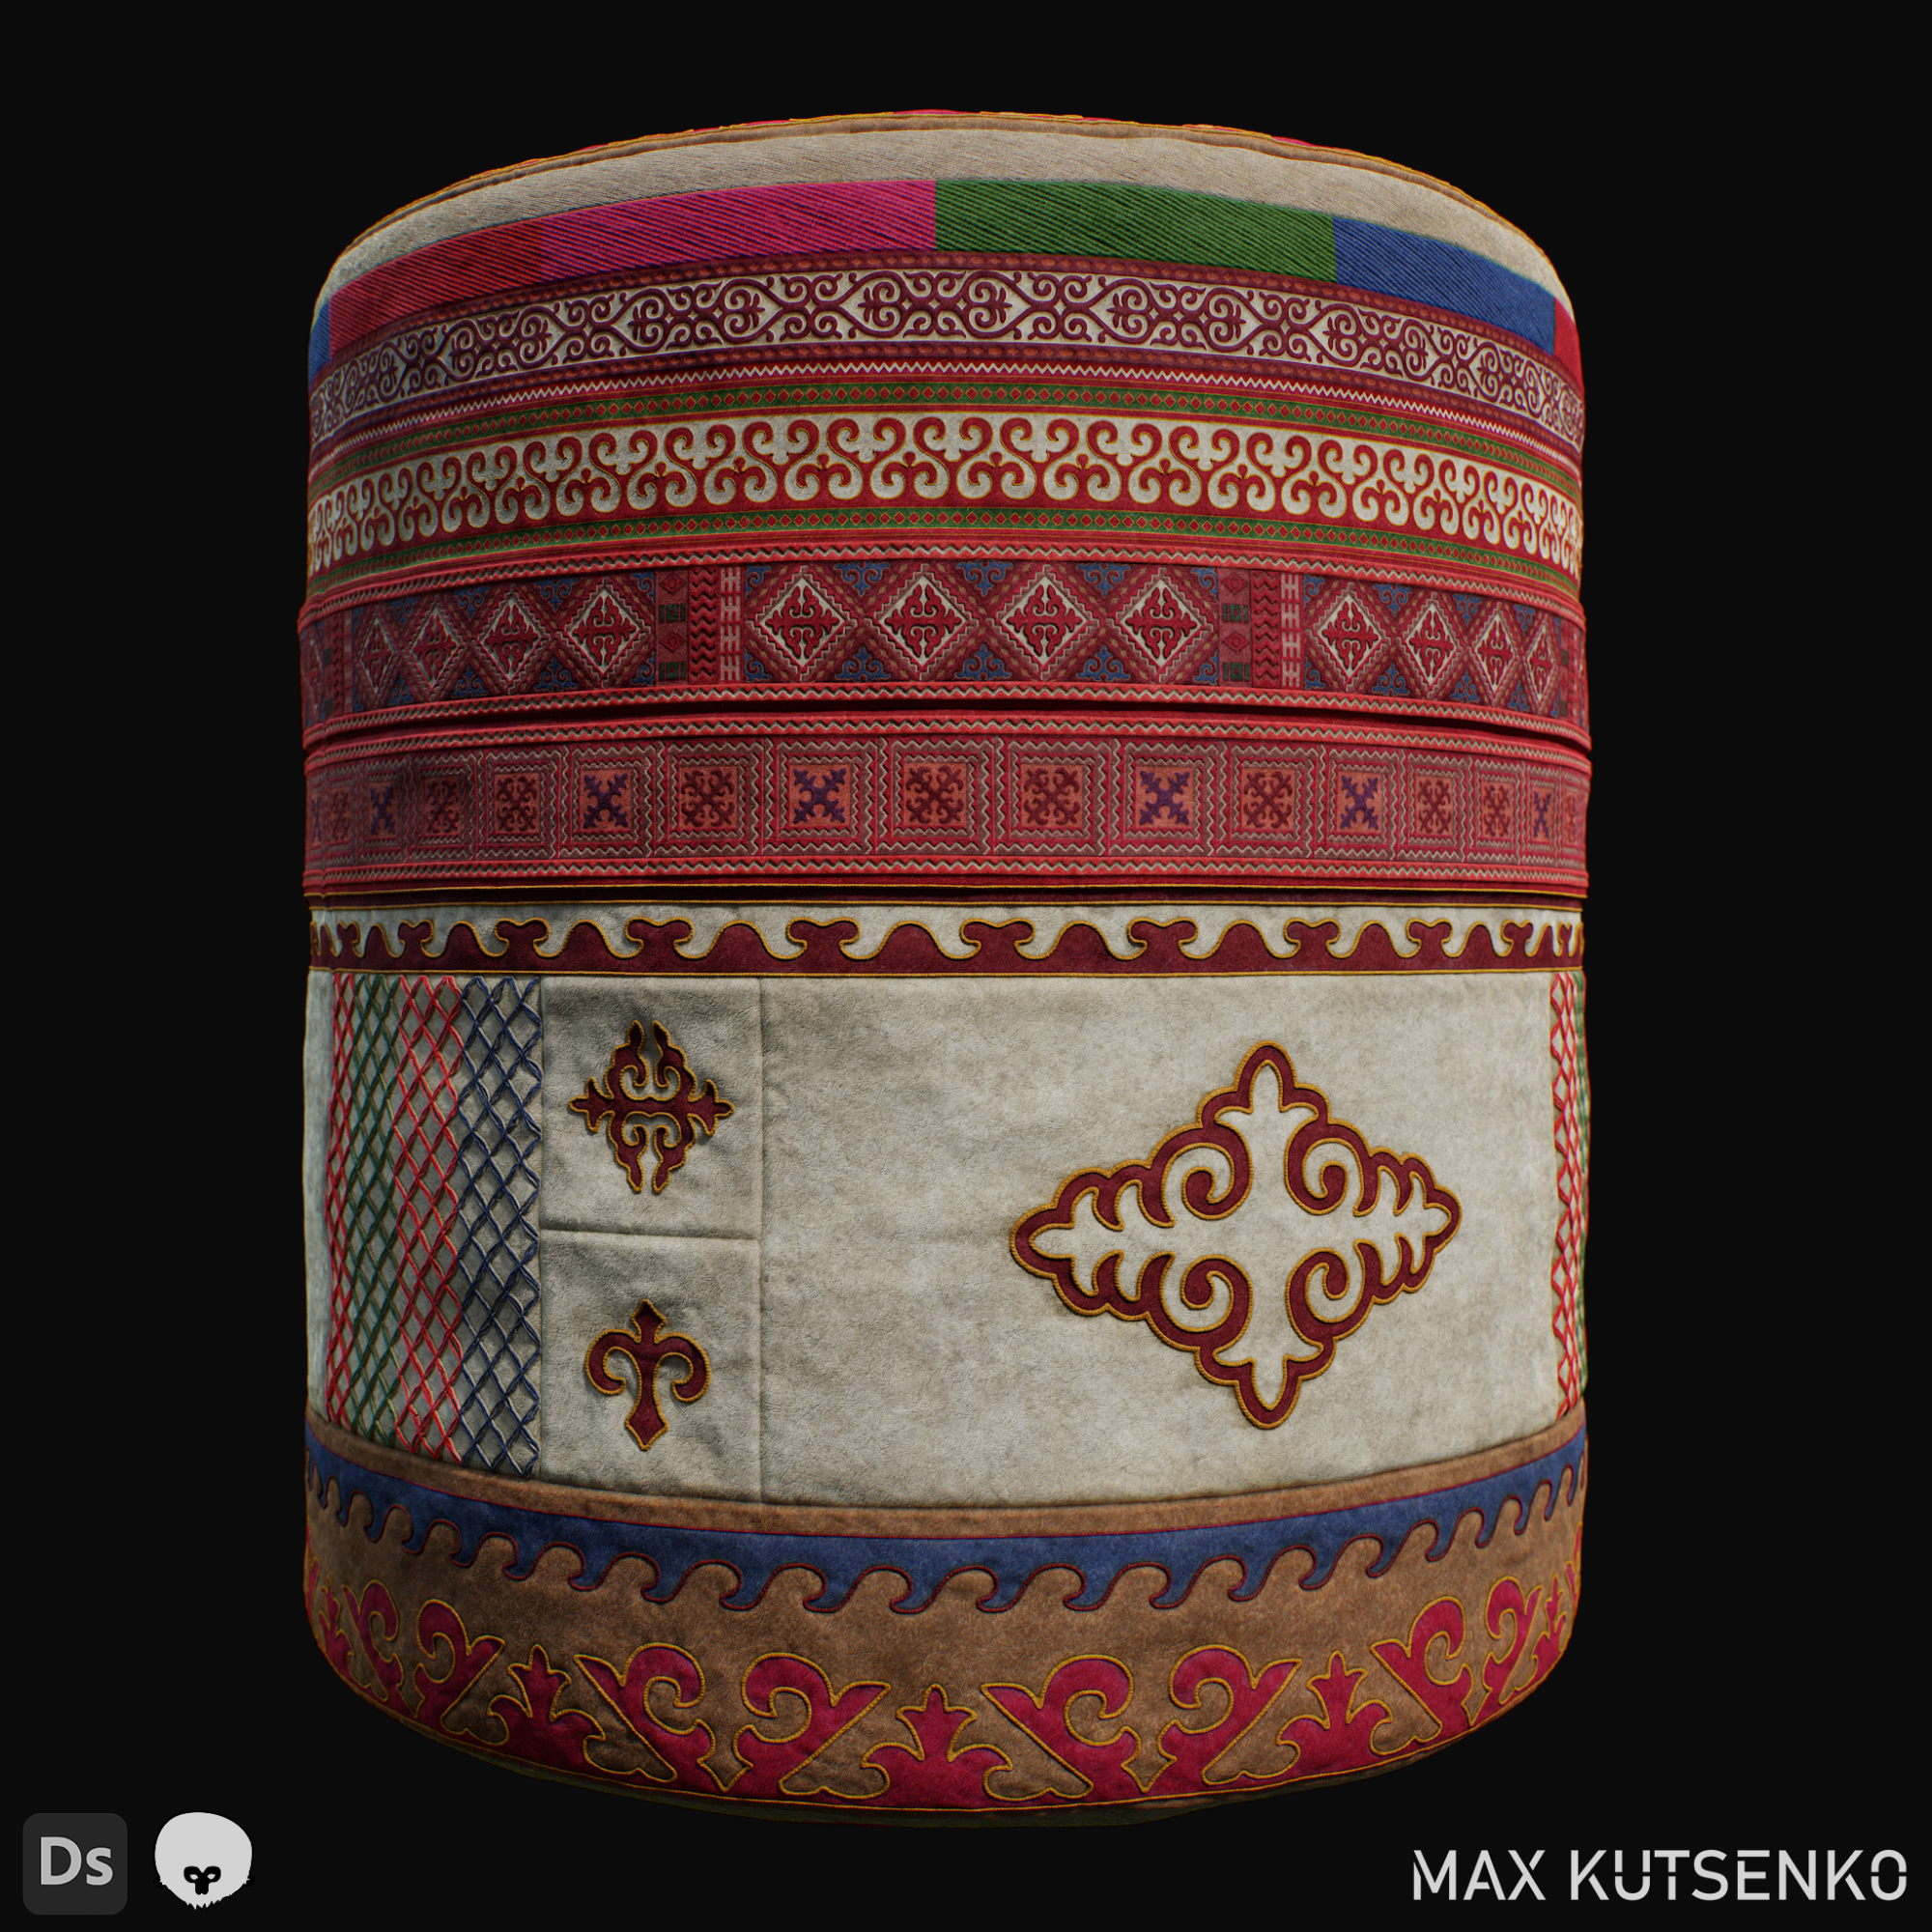
Once the base felt material was made, I moved on to making trim with Kyrgyz patterns that will eventually adorn the yurt. I tried to include a wide variety of interesting ornamental details with saturated and punchy colors such as red, green, blue, pink, and purple.
For the ornament creation, I relied heavily on the SVG node, a super handy tool that allows you to draw curves and create complex shapes quickly. A procedural approach would have taken me a long time.
I covered this node in my previous article on church trim, which you can find here:
https://gamesartist.co.uk/church-wall-trim-substance-material-creation-max-kutsenko/
Once I had the shape, I ran it through the “Tile Generator” to arrange it into a horizontally tiling strip.
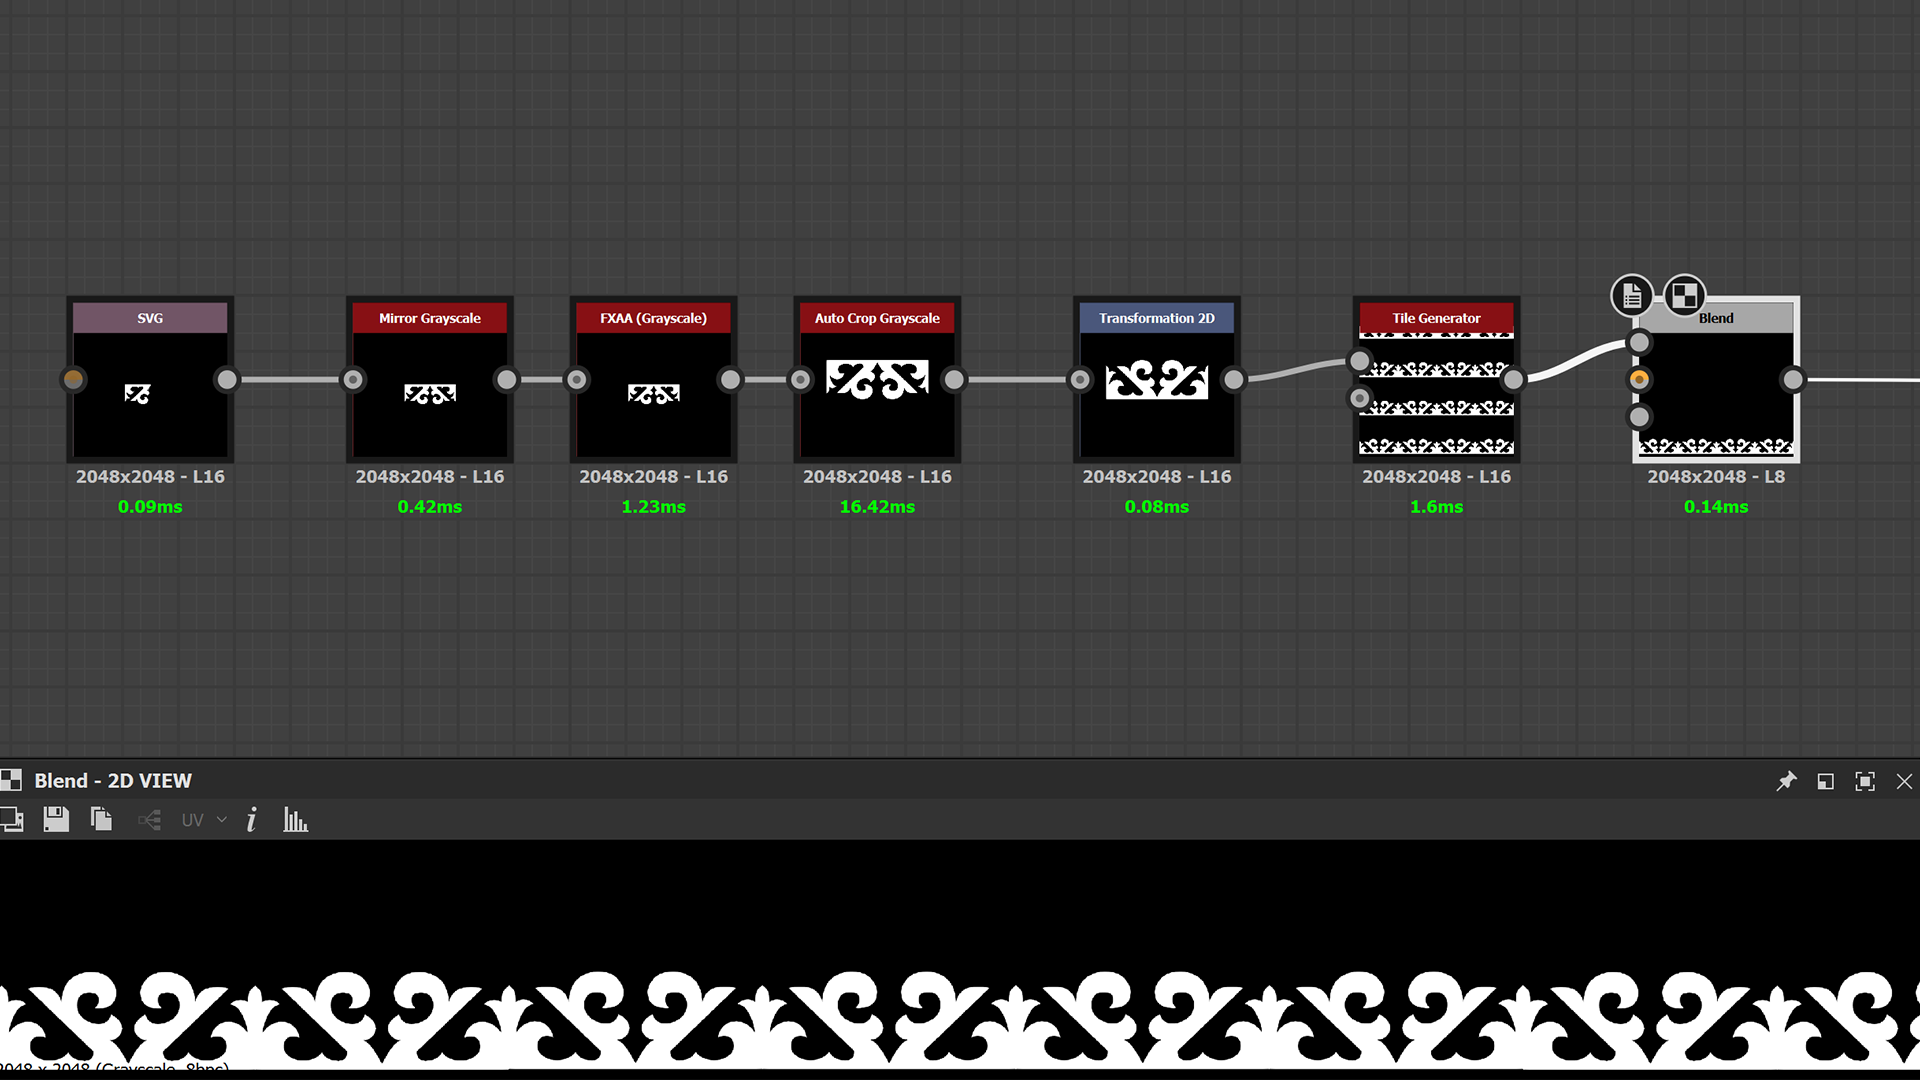
I repeated the same process for the rest of the ornaments. Again, I approached the entire trim assembly in an identical way to the church trim, so please check out my previous article where I explain my approach to building trim in Designer.
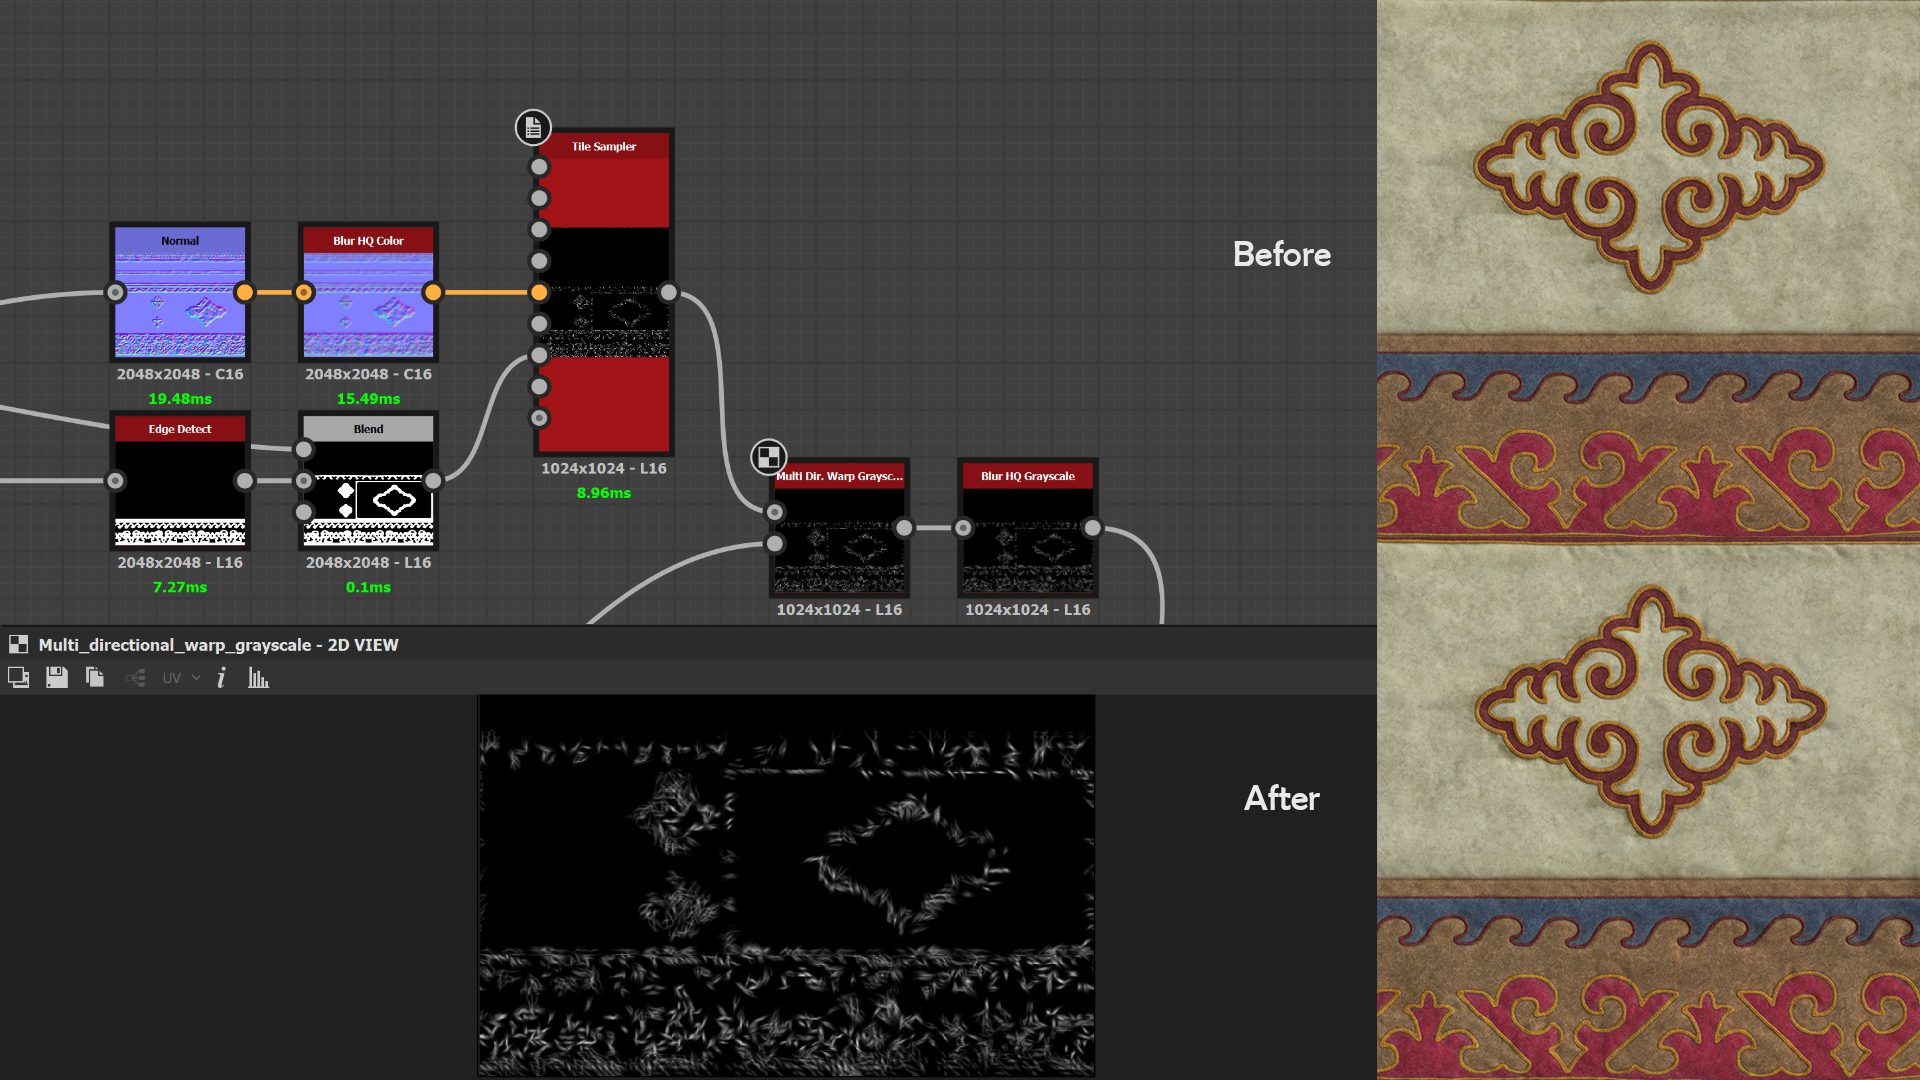
Once I have all the shapes together, I warp them a few times to create imperfections, give them a bit of volume, and apply some small folds to the edges to convey the idea that the pieces were stitched together by hand. To do this, I scatter a Gaussian shape based on the edge mask and also plug in a pattern normal to the vector map input.
This greatly helps in aligning the Gaussian shape with the pattern’s angle. Then, I warp, blur, and subtract the result from the base height.
Lastly, I assign uniform colors to my shape strips, making sure they complement each other. This is when extensive reference gathering made beforehand really helped in guiding my color selections. The idea was to keep it as authentic as possible to Kyrgyz yurt color palettes. Here is a short GIF breakdown of Albedo’s progress.
Below is the final trim render.
UVing
My approach to UVing the yurt was quite straightforward. I relied primarily on the “uvflatten” node, which is my favorite UV tool. Let’s take a look at the example video where I handle the UVs of the curvy ribbon on the roof. Firstly, I cut my own seams, select the cut pieces, and convert them into perfectly straight strips using the “Rectify Groups of Quads” button.
I love how quick and effortless it is to do in Houdini. Lastly, I scale and position my strips in accordance with my chosen yurt pattern. I pretty much applied the same technique to the rest of the yurt.
Rendering
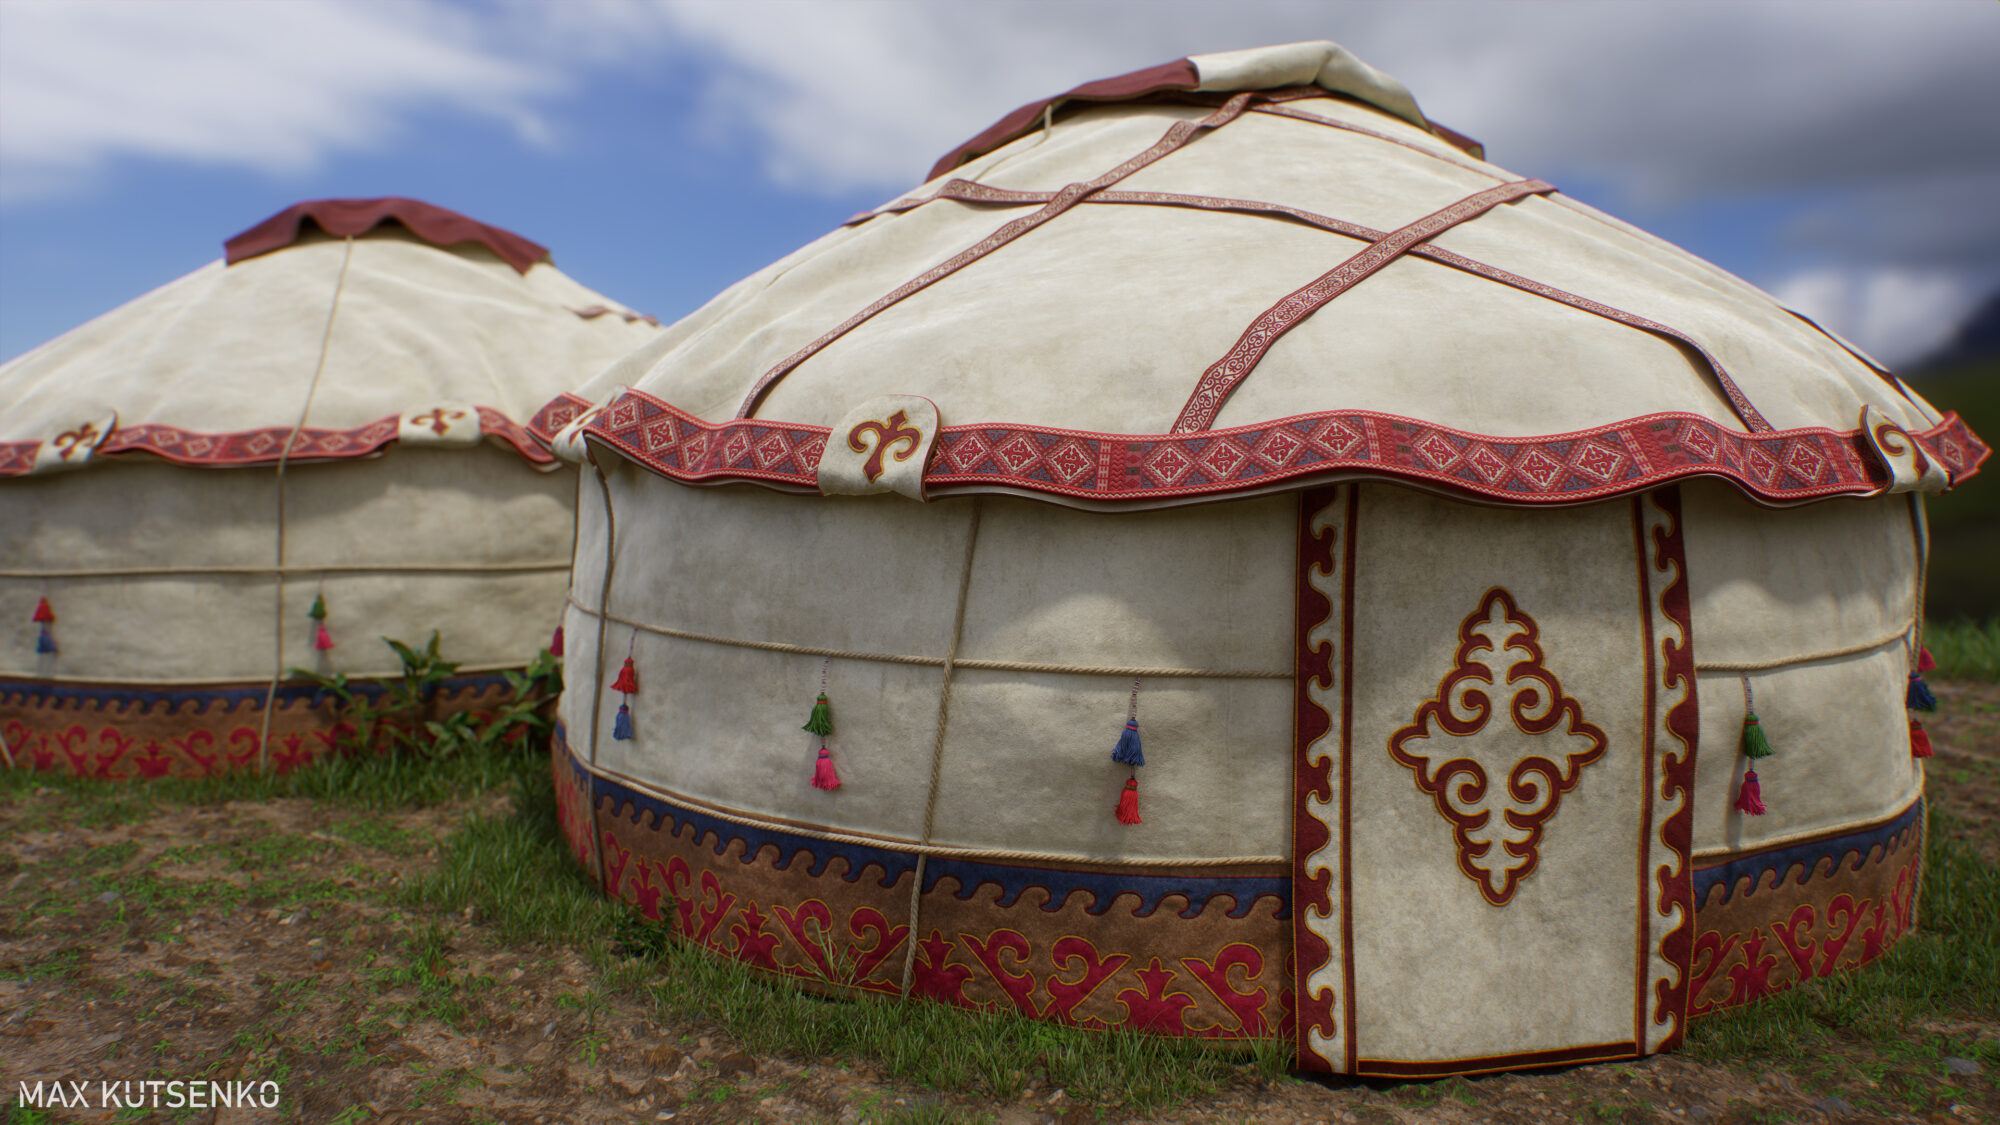
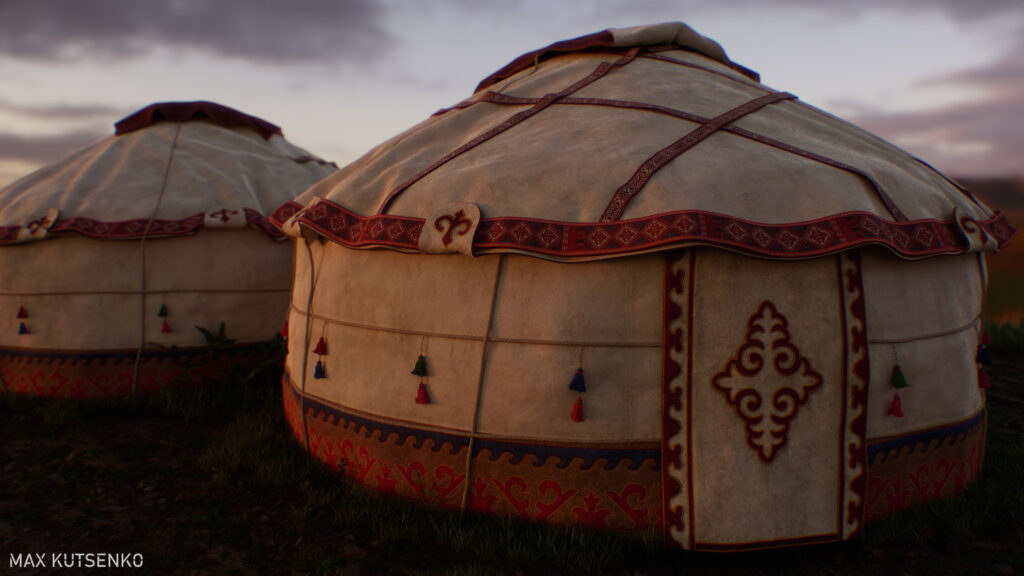
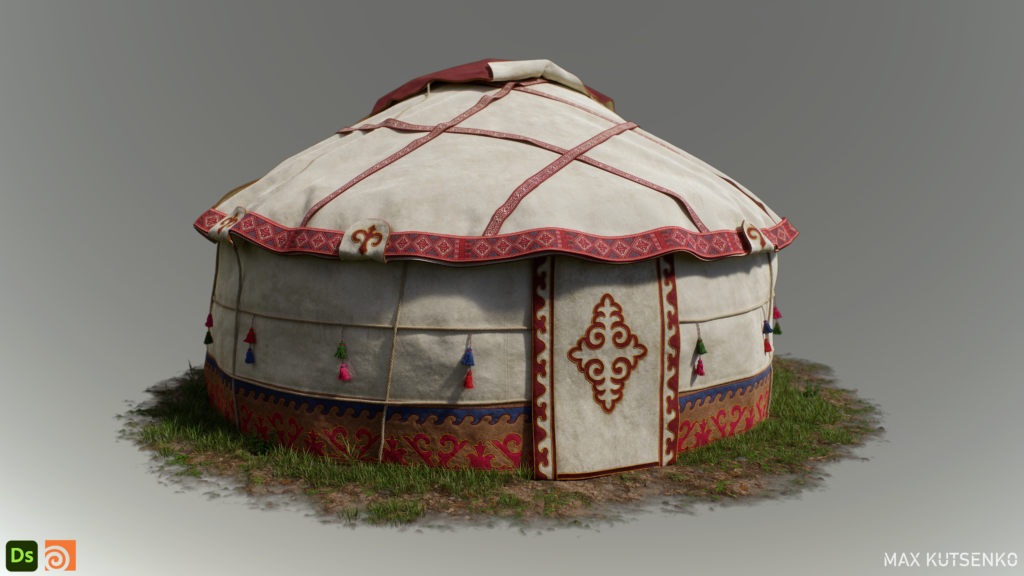
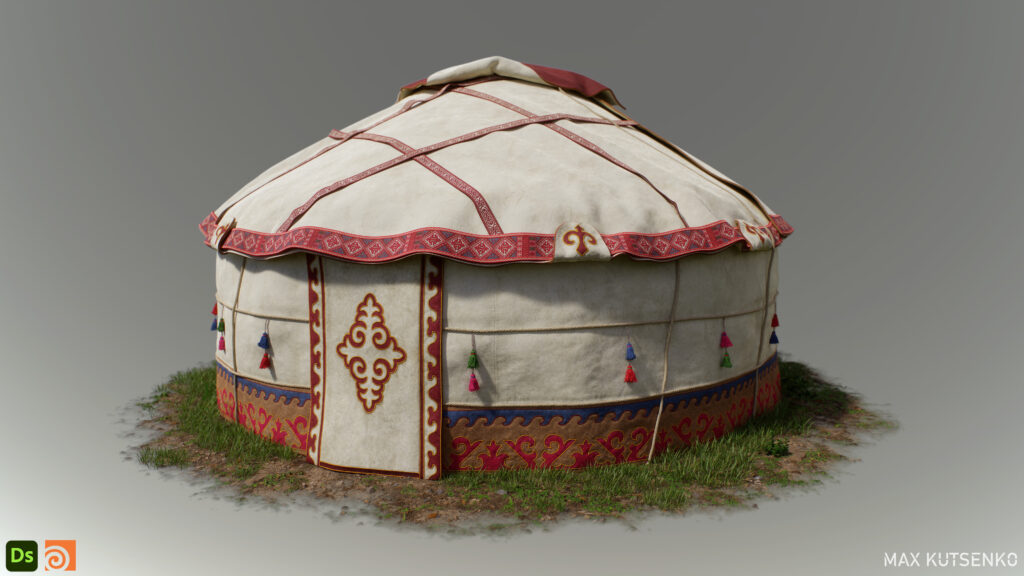
Once I had finished modeling and texturing the yurt, I brought the scene to Marmoset Toolbag 4 for the final render. It already looked decent, but I felt that perhaps adding some foliage would make it even better, so I created a small diorama. I used a scanned ground mud material from the Substance Assets page and applied a round alpha map to make it circular like the yurt.
Then, I obtained an awesome Plants pack from Paul Sandoval’s store and carefully placed them on the ground, similar to my reference picture.
For the lighting, I chose a sunny mid-day sky map and didn’t use any additional lights. I relied solely on the HDRI map as the light source and used some raytracing magic. I wanted to keep the scene natural and minimalistic, and I was quite happy with the final result.
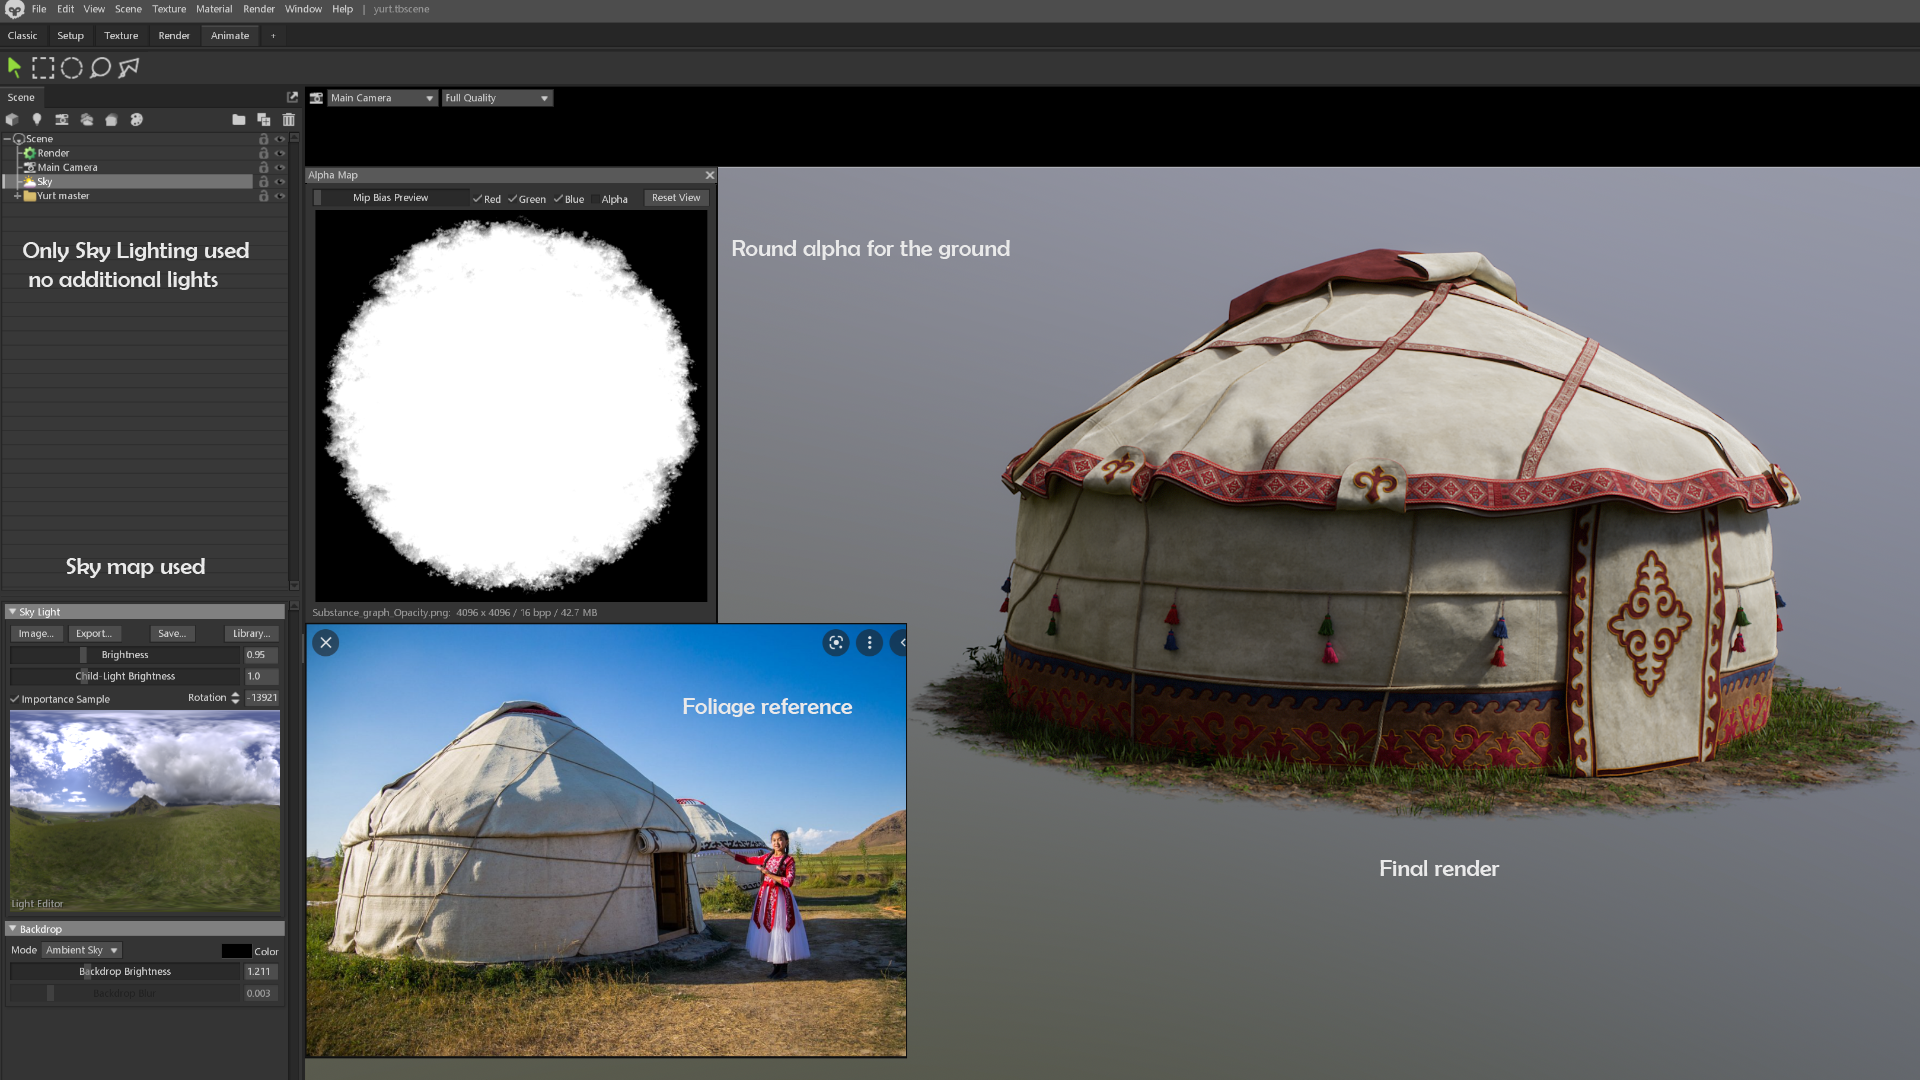
And here is the final result.

Conclusion
To sum it up, I really enjoyed working on this personal project as it allowed me to explore Houdini a bit more.
I hope it will inspire some readers to try it out for themselves. Like with any software, it might seem daunting at first, but if you persist and perhaps try to incorporate Houdini into your workflows on small-scale projects, you will realize how powerful this program can be.
So, give it a shot, guys! Thanks for reading the article and keep on creating!
Read more articles
You might also like these articles.