UZI PRO SMG


Introduction
Hello! My name is Andrey Sdobnov and I've been a 3D Artist for 3 years.


Goals
As a fan of hard-surface modeling, I wanted to make something with a lot of edges and cavities, with interesting forms and surfaces. I also wanted to practice with Substance Painter to improve my texturing skills and learn something new, like Fusion360. I’m always trying to put something new into my workflow.
Software
I always use Blender for modeling because of its flexibility and I take to it like a duck to water. ZBrush is for making bevels speeded up, Marmoset Toolbag for baking, Substance Painter for texturing and Fusion360 is for making a sight with a lot of bevelled and curved surfaces.
References
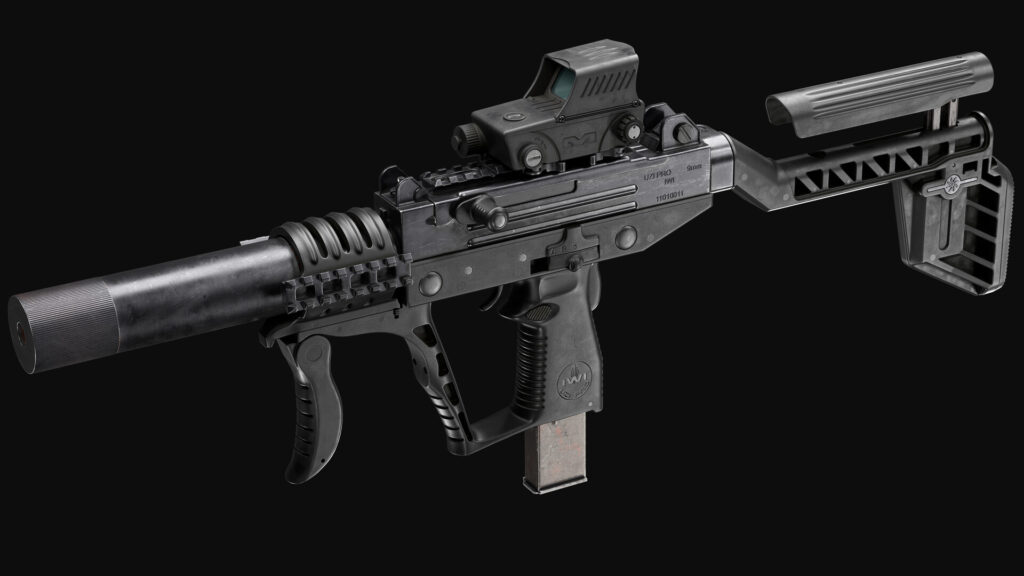
I knew that I needed a firearm to fit my goals, but old firearms like those that predate WW2 weren’t suitable for me, so I spent a lot of time digging through Pinterest and looking for a proper modern firearm. Finally, I found IWI Tavor 7 which is pretty cool, but too curved for me, but the other version of the IWI’s gun, UZI Pro SMG, was just perfect for my purposes. I’m not an objectophile, you know, but this silhouette did make me tremble… Just look at it!

Once I found an object, I started picking up references from YouTube videos, auction boards, Google Pictures, etc. In the end, I had something like this:

Even if this particular picture is not exactly what I want, I still take it and mark it in PureRef to focus on the details. Here are the rules:
First – you want as many references as possible, from multiple angles and with different lighting. I had trouble with this uzi – I couldn’t find a reference that could show me what was going on under the cheek rest so I had to invent it myself.
Second – you want to have a high-resolution close-up of every part of the object to see its material clearly.
Blockout/Modelling
I started with my main reference (the most overall reference), which was this:

I have divided the whole gun into different parts to understand what technique I have to use for every single part. For example, it‘s easier to make a receiver with a bevel modifier in a weight mode, not a subdivision one, and much easier to make a grip with a subdivision (or curves!), not a bevel.
I prefer to work non-destructively when possible, so I always have ready-to-use lowpoly. But with this one I used standard workflow most of the time, the only things that didn’t apply were bevels and booleans. I didn’t use bevels with a low radius that didn’t affect the form at all since I wanted to make polish in ZBrush.
The most tricky part was the grip because of its non-regular flow so I used a standard subdivision with support loops, creases etc. Also, I usually don’t pay attention to parts that cannot be seen and NGons on flat surfaces – the only important thing is shading.


I use saves a lot and I always duplicate objects in the “trash“ collection to have a copy of geometry just in case. Here is an iteration:

Sometimes it becomes a nightmare when I forget something or make something wrong, so I’ve got a checklist in Notion to remember what I need to do and what should not be forgotten. It contains items such as:


Fusion360
I used Fusion360 to make the Mepro m5 because of its bevels and rounded forms. I was not going too deep here, only the basic forms without any decoration elements like engraving, lines on the sides, or “grooves” on the top. All extra details you can make in Blender easily and smooth it in ZBrush later. It is convenient to work non-destructively since it is one of Fusion’s features. I can say that Fusion is a tremendously easy-to-learn software that I highly recommend using.


Highpoly and sculpting
Here I bring all my meshes to ZBrush to make some booleans (if necessary), welds and bevels. Bevels are different for each part of a model, it depends on how this particular piece was made (casting, milling, etc), you can find videos of this process on YouTube. I go through each part masking and polishing and once I’m done, I decimate this and export it in FBX for baking.


Lowpoly
At this stage, I’m deleting all unnecessary surfaces that cannot be seen and all inner structures of a model. I’m deleting half or more verticles of circles that don’t affect silhouette, you can notice that the bolt has more verticles around the bottom because you can see its roundness in that place. All the drowned features must be baked and all the stick-out features must be separate from the main mesh.


UVing and baking
There is nothing special – a sharp edge is a seam. Try to make fewer seams. Quadrify shells when possible. Use overlapping on secondary surfaces without unique details like text, engraving, etc. Use add-ons or special software to pack shells (UVPackmaster for Blender is a masterpiece).
For this model, I divided all meshes into three texture sets to have consistent high texel. (Meshes were divided based on the scale of the shells rather than similar materials, which was not my best decision).
For bake, I divided meshes into groups and adjusted the offset.
“Paint skew” mode can help with distortion on baked surfaces. For the test, I baked Normal Map and AO textures in 2k checked that all were okay and then baked all maps in 4k. The curvature map was baked in Substance Painter because it is much more cleaner.
Texturing
The most important part, I suppose. Bad textures can ruin all work you have done. Working with texturing, you need a high-resolution close-up photo to understand what material is in front of you.
I started with base layers with color and roughness to have a basic vision of the model. It helps to compare the colors of different parts of the model. The next step is to set up height texture to see how exactly the material shades and reflects. In general, this work stage aims to get “clean” textures, as if you were seeing an entirely new object, not dirty or used before. Here is mine:


I wanted to increase the “artiness” of the UZI a bit, so I darkened some areas in separate layers and lightened others. For example, I darkened the deep holes on the model, so that the model looked a little more contrasted. Here you can see the darkening:

For these purposes, not only do I usually use generators, but since generators are pretty recognizable and regular, you have to use generators in conjunction with b/w alphas to break regularity. While working, I also used paint layers very often to modify generators’ work, that’s breaking regularity too.
Before I move to dirt masks and other wear, the next step is to break dull surfaces with color variation. I use a common fill layer with a black mask and a lot of alphas with low values so that I can add a slightly barely-see variation of color.

For wear, I created a mask with some generators and paint layers to specify where I wanted to show wear. You always have to use references of a real firearm to see which places wear out the most. I painted slight scratches and other types of damage with stencils. I also made some oil spots and roughness variations to break the regularity of glare when I will render it. Most of the time, I use a mix of generators and paint/stencils layers, so I can take advantage of both.
I didn’t go too deep with dirt because it’s not such an old gun. I added the primary dust generator, painted some cavities, and that’s all. The more valuable part of wear is scratches and roughness imperfections which make up the most part of my job.
Rendering
I rendered in marmoset and there are no specific steps. I always set the light intuitively to catch beautiful highlights on the subject and highlight interesting places. Most of the time, I use a combination of a few soft lights and hard directional lights. I also used Photoshop to increase the contrast of renders slightly.
Conclusion
I hope this article was at least a little helpful to you. I didn’t cover many aspects of the working process, so you can always text me by mail or ArtStation, I will help in any way I can. In any case, missed aspects are the reasons to write another one, this time, an ultimate article!
Thanks for reading. Many thanks to Games Artist for inviting me!
Read more articles
You might also like these articles.


