
Introduction
Hi everyone! My name is Andrew Melfi, I’m 23 years old and am a recent graduate currently pursuing a job as a 3D Environment/Prop Artist in the games industry. I predominantly create stylized artwork since that’s the art style I enjoy the most.
Goals
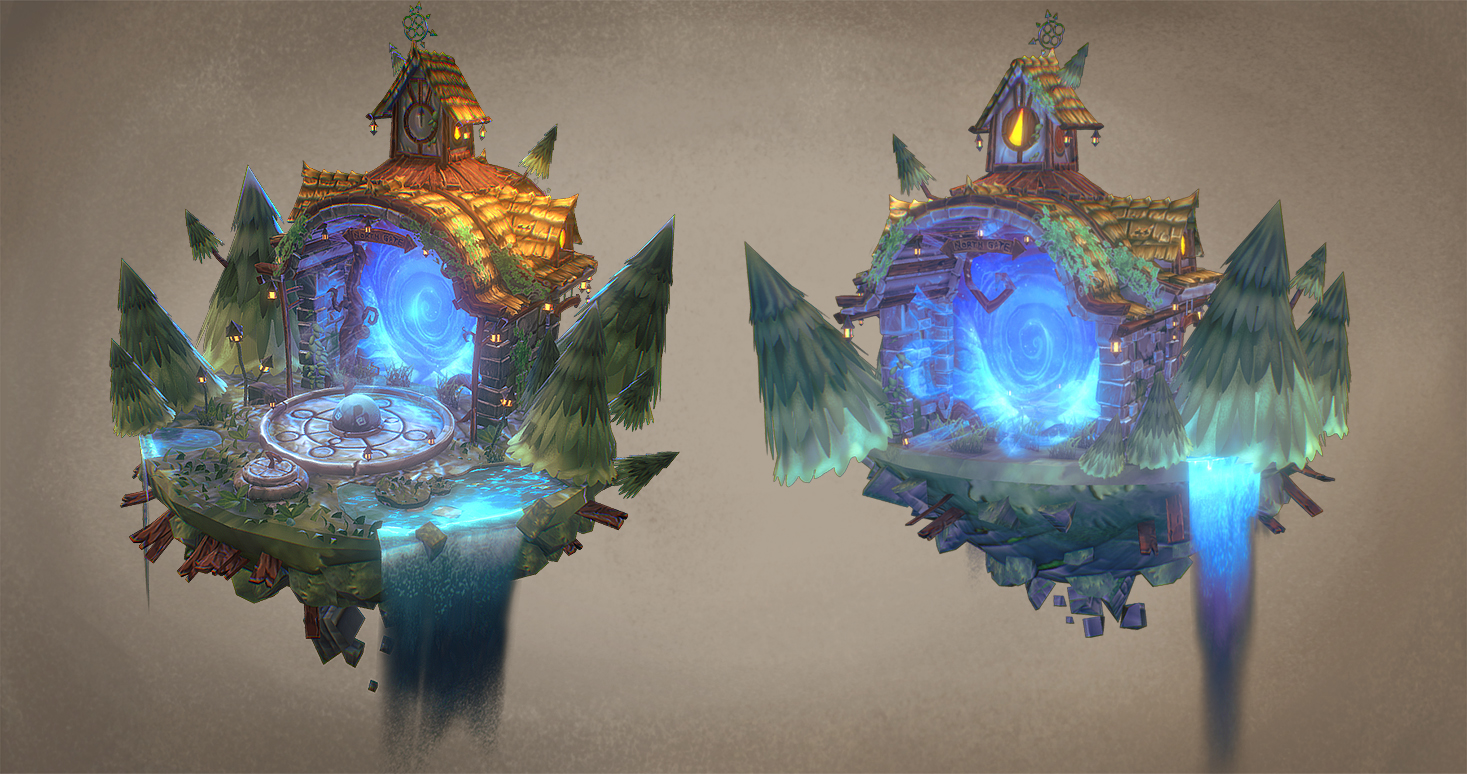
My main goal for this project was to capture the aesthetic and whimsical feel in 3D that the 2D concept had with the use of lighting, exaggerated geometry, vibrant colours and stylized hand-painted textures.
References/Inspiration
I found a concept on Artstation by an amazing concept artist – Jenny Brozek (https://www.artstation.com/artwork/Aq98zV), and decided I wanted to create it in 3D. I really loved the concept because of its vibrant colours, whimsical and fantastical aesthetics and the variety of natural and artificial elements.
These are things I wanted to capture and emphasize in my 3D scene as well as setting myself the task of it being completely hand-painted as I love that kind of art style. I also took inspiration from World of Warcraft and would often find myself looking at textures and assets around the world to get an understanding of how it might’ve been created. I would recommend doing this to any artist looking to specialize in an art style or perusing a job at a specific studio.
The software I used in order is:
Maya – Modelling/UV’s
Substance Painter – Base textures
Photoshop – Texture painting
Sketchfab – Rendering
Modelling
After importing the concept into Maya, I started the modelling process. Since the main assets in the scene are the portal and the building, I started with modelling those first. I then went on to create the larger assets like the trees and ground, working my way to the smaller details like the portal effects and grass.
Not only did I combine assets into layers, but I also had to separate the model material layers to be able to isolate each texture map. This was a difficult part of the project as it meant I had to figure out which parts of the model to combine together into a single map.
The video below shows you the parts of the model that share the same map. Using mesh>mirror was really helpful throughout the modelling part of this model as it mirrors the selected parts by the X, Y or Z axis. This also means the mirrored assets would be exactly the same, therefore when it comes to UV’ing, the shells should be able to stack perfectly. I always had the polycount of the model in the back of my mind whilst creating this because of course I didn’t want it to be higher than necessary.
As this scene wasn’t going to be detailed in ZBrush, I didn’t see the need to create a lowpoly blockout, therefore I was able to delve into the basic details of the model, adding some stylization and exaggeration to the various assets.
The majority of the details came from the base colour and normal maps though since my references/inspirations did the same. A lot of this required me to find ways of making usually simple assets like a wall, interesting by adding extra geometry and shapes.
For example the brick wall each side of the portal is just a brick wall, but by adding a few bricks sticking out just makes the overall shape more interesting, also meaning that the normal map isn’t doing all the work to make the wall brick wall look 3D.
You’ll see this trick throughout the piece, like the roof tiles as well for example. It was important to make it look natural by lining up the tiles and bricks sticking out with the flat texture, otherwise it would look a bit weird and un-natural.

UVing
The UV’ing was all done in Maya once the model had been completed to a standard I felt was good enough. This is where combining the assets as I mentioned earlier comes in handy as spreading out the assets, having a few UV’s on each map not only makes painting a whole lot less difficult and confusing, but it also allows the shells to fill more of the map, therefore increasing the quality of the textures themselves.
Stacking shells is also an important way to speed up the texture process as it means whatever you paint onto one shell will translate onto the other shells underneath which also lessens the workload significantly.
Baking
When it came to baking the model, the main maps I baked in Substance Painter were Curvature, AO, Roughness and Metallic. Curvature allowed me to easily understand where the edges of the textures were in order to easily add the signature light edges to the textures that stylized artwork usually has.

The normal maps were generated from the painted base colour texture map by using a really good map generator online called normalmap-online. This was done various times throughout the painting process to make sure the maps looked ok on the model or to see if any part of the texture needed changing.
As you can see in the image the ‘Use Low Poly Mesh as High Poly Mesh’ box is ticked because as I mentioned earlier, I didn’t make a high poly version of this model therefore I just used the original low poly model created in Maya.
Texturing/Substance
Since this model was created using another artist’s concept, it was very important that I got the correct materials, textures and colours. I did have to texture the various layers of combined assets separate before putting them altogether for the rendering in Sketchfab. I used Substance Painter to get the base materials such as tiles for the roof, stone for the walls, grass for the ground etc.
I then was able to alter the colours according to the concept to make it as similar as possible. This was an important step in my process as personally I am able to work better once I have a starting point to work from, if you’re an artist that can often work from a blank canvas then you could likely skip this step.
After exporting the various maps from Substance Painter into Photoshop, the painting process began. The painting process was possibly the longest step in the creation of this model because unless there’s an obvious issue with the geometry, you’re more likely to see mistakes in the texture rather than the model itself. I did all of the painting onto the texture maps in Photoshop because I am used to Photoshop and felt more comfortable since this was quite a big project and I didn’t want to try and learn any new software in the process.
An alternative to Photoshop would’ve been using 3DCoat, however towards the beginning of the project I was figuring out what assets to pair together and trying to texture them in 3DCoat which didn’t work very well and ended up costing me a day or two of work. Having said that, 3DCoat is a really cool program and I’ve seen a lot of really nice work from artists that have used it in the past and I plan on learning more about it in the future with smaller projects such as weapons.
Polish/Final Pass
When it comes to painting models and rendering in Sketchfab, for me personally, there’s usually quite a lot of back-and-forth. For example, when creating the model there’s often things I might have missed from the concept or things that need removing/altering but setting up the render is important throughout painting as the colours need to match that of the concept. As well as the addition of colours and lighting helps me see if I’ve missed anything.
Lighting/Rendering
Both the lighting and rendering were done in Sketchfab as it’s really easy to set-up and fun to work with. Sketchfab only allows the addition of 3 light sources in the environment so in that way I was pretty limited, however since it’s a pretty small diorama scene it didn’t limit me too much. The light sources available are a Directional light, Point light, Spotlight and Hemi light.
Also being able to add some post-process effects helped make the colours a little more vibrant, as well as adding a very slight orange/red hue to the shadows and highlights to contrast with the strong blue light in the centre of the portal as well as from behind the scene.
Rendering the scene is one of my favourite parts of creating these scenes as it allows me to see the model and textures merged together with the addition of lighting and effects. Making the end result look as good as possible is always really satisfying for me as an artist.
Below you can see the difference between the render with post-processing filters in Sketchfab and the render without.

The post-process filters available in Sketchfab are in the image below and you can also see the ones I used.

Once I was happy with the render I called it finished as personally, I tend to look at my art too much and end up finding things I don’t like too much or want to change and up risking making it worse.
As of recently I’ve gotten a project to a place where I’m happy with it, taken a few days off by not looking at it at all and possibly even starting or continuing with a different project.
When I end up coming back to see if I notice any issues I may have not noticed previously, quite often there isn’t any or only minor things however it’s a helpful way of just confirming that the project is ready to be published.


Thanks for reading my short write-up about how I went about creating and rendering this scene, I hope you learnt something from it.
If you want to see more of my work on my portfolio you can view it here: https://www.artstation.com/andrew_melfi
I also recently made a Youtube video for StylizedStation’s Youtube channel about how to make a 3D hand-painted sword. If you’re interested you can watch it here:
https://www.youtube.com/watch?v=V_oYhy0Aq8c&t=376s
Contact information:
[email protected]
https://www.linkedin.com/in/andrew-melfi-25309991/
or alternatively, you can drop me a message on Artstation.