
Introduction
Hi everyone! My name is Stefan Zeibekis and I am a recent graduate currently pursuing a job as a 3D Environment Artist in the game industry.
Software
The programs I use are 3DS Max, ZBrush, Photoshop, Substance Painter and Designer, and UE4.
Goals
When starting this project my main goals, apart from creating something for my portfolio, were to learn to take my time with every asset and not to rush. Also putting more effort into pre-production.
References/Inspiration
After browsing through the Internet, I found a pixel art smithy on Artstation by Murilo N (https://www.artstation.com/mupixl), which immediately inspired me.

Now I just had to start gathering references of real smithy’s. When gathering references and I’m not sure yet how I want something to look like, I start by getting all the images that I like, but when starting to work I just keep the images that show as close as possible what I want. I also like to look for images of already existing 3D models, since it can help to get an idea of how to approach what you want to create.

Planning/ Pre-production
Like I already said, putting more effort into pre-production was one of my goals, since it is one of the most important things before starting your project. Spending a bit more time on it will save you time in the long run.
Usually, I start with my pre-production either at the very start, to figure out what I want to build or after gathering my references. When I want to figure out what I want to build, I think about what my setting (art deco, post-apocalyptic, sci-fi, fantasy, and so on) of the world could be and in what time period (medieval, 18th century, future and so on) it is. The next thing I think about is what kind of game it will be (first-person RPG/shooter, third person, top-down, …) and if it’s an open world, a linear level, or whatever else.
To not lose this vision I write everything down in a pre-production document (I use windows sticky notes). Sometimes it also helps me to define “closing doors”. Those are just things to further define what I want to do. For example, in my smithy project, I defined that I don’t want it to be weapons smithy. This helps me not get a weird mix of cool ideas I got during the project.
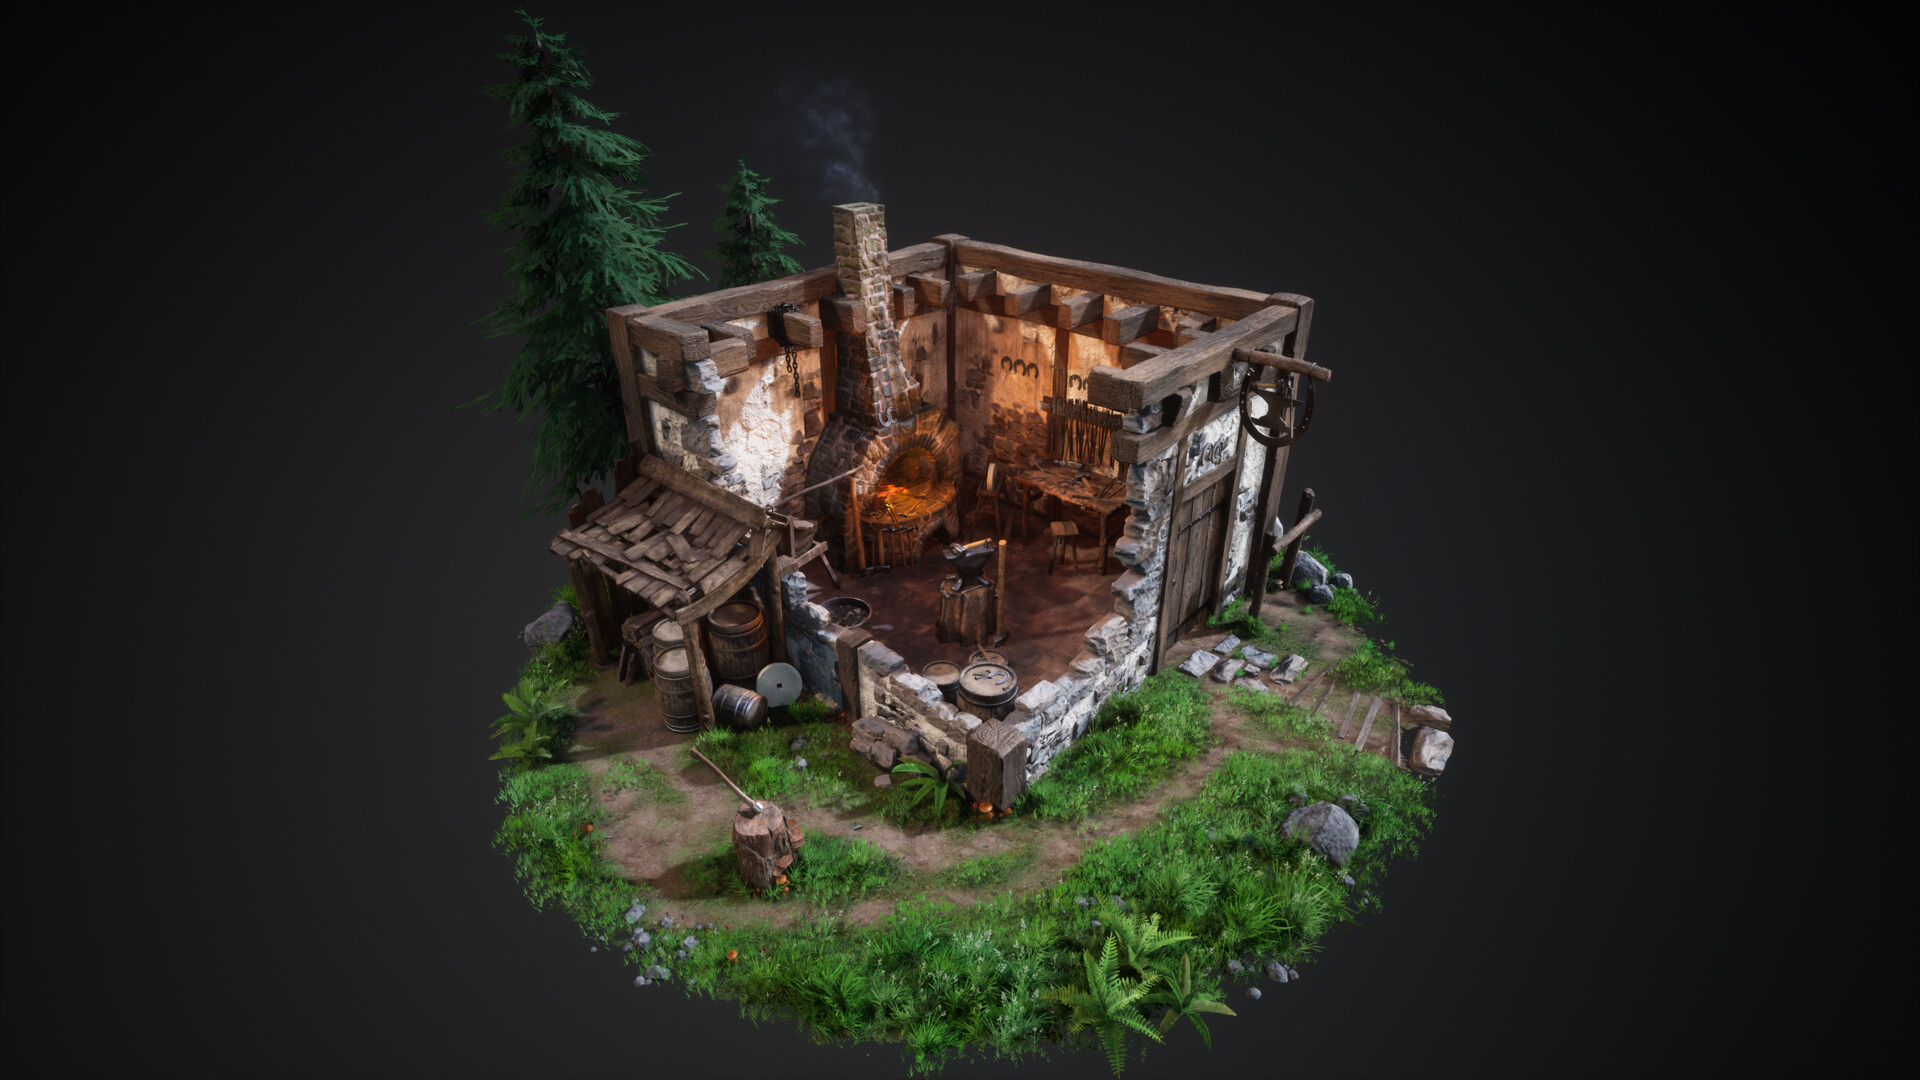
My asset list I always create after getting all of my references. I simply check my references and write down in my sticky notes what I see often in the pictures and what seems to be the core of the environment. For my smithy that was for example the furnace, the anvil on a tree trunk, lots of tools everywhere (hammers, pliers, and chisels), a working table, walls, and a lot more. When I’m done with this step I check everything I think about what kind of textures I’ll need to create and which meshes could use the same material.
I write everything behind each asset with a first estimation of how many hours it’ll take me to model and texture it (in my smithy project instead of how many hours I need, I wrote down the day I want to finish it). In my experience thinking of how many hours something takes you, instead of how many days gives you a better feeling of the actual time you need. The more experience you have, the better you’ll get at estimating your time.
Most of the time when for example I think I’ll need five hours to finish something, I simply write down ten hours, to give myself a bit more time and have room for unexpected things that could happen (trust me, something will always go wrong, no matter how often you’ve done it).
Now that I have everything written down I look at everything and start prioritizing what is the most important to get the scene done and what is just some cool detail. In this order, I start building everything in the end.
When I have set myself a time limit for how long I want to work on my scene, I cut everything from my asset list which is just nice to have. If you progress faster than you thought you can always expand at the end, but cutting, later on, is just stressful.
Keep in mind that while building your scene you still can go into your pre-production document to make adjustments, but try not to change the core plan if possible.

Blockout and setup in UE4
Since I didn’t have a concept, I used the information from my references to start conceptually blocking out my smithy. When I was happy with the layout I imported everything as a single mesh into UE4. I started setting up the light and the master materials for unique textures, tiling textures, and foliage.
Then I assign a base color and a basic roughness value to everything. This helped me get a better first impression of my scene. I also like using models from previous projects in my blockout, since they are more detailed than just a blockout, even if they don’t fit 100%.

Asset creation
Now that everything was set up and planned out, I felt comfortable with creating the final assets. I usually start by creating the big shapes, which is why I started with the brick wall. I knew it was going to be a tiling texture on a simple mesh, but I also needed real geometry bricks which I could stack on top of the edges of the open part of my walls.
For these, I just took some bricks from my high poly, created low poly versions of them, and baked the high poly details. Since I created the textures for the brick wall in Substance Designer, I just had to plug in the baked textures from the unique bricks into the same graph and automatically had bricks that fit in perfectly with the tiling texture.
I learned this from Martin Teichmann’s tutorial (https://www.thegnomonworkshop.com/tutorials/building-a-stylized-environment-volume-1)on The Gnomon workshop. If you want to learn more about environment art, I highly recommend getting a Gnomon membership for one month to follow his tutorial.
Apart from creating base materials for wood and metal in Designer, I decided to sculpt some unique wooden objects and use those to create several other assets, like for example the wood stash or all wooden elements on my walls. You can easily bend and slightly scale the wood parts, without distorting the UVs noticeably.


For these meshes, I set up a switch to the second UV channel in the unique textures master material. I was now able to use the unique normal map of the wooden objects and give the assets an AO map through the second UV channel. For some, I even made a unique base color and roughness map. Approaching many assets this way, helped me save a lot of time.
For the smaller props, like the pliers and hammers, I used unique textures by modeling the low poly in 3Ds Max, adding some high poly details in ZBrush, and baking in Substance Painter. How many assets I put into one texture depended on the set’s texel density.
Texturing wise I kept it simple. I applied my base material from Designer, then started to add color and roughness variations, edge wear, dirt, and sometimes a bit of dust. I like using smart masks, Add Fill with grunge maps and Add Levels to achieve what I want. Just play around with the parameters.
Tiling textures
Tiling textures I usually create either in Designer from scratch, or I start by sculpting a high poly in ZBrush, the maps I need and import them into Designer.
The second workflow I used for my brick wall. I went a little bit back and forth between 3Ds Max and ZBrush for it, while I probably could have done all of it just in ZBrush, but for some parts, I just felt more comfortable in 3Ds Max.
I started by creating five beveled cubes with slightly different shapes in Max, which I then imported into ZBrush. There I refined those shapes at a higher polycount of about 50k per brick and once happy with the shape, I went back to Max.
In Max, I did the layout of my brick wall and made it tileable. I start by placing the same brick with snapping activated at every corner of a plane. Then place more bricks between the left and right, to create the first row. After that, I like to work from the bottom to the top, like building a real wall. Just taking a random brick and placing it the way it fits. Leaving gaps for the grout between every stone.
When I’m done, I jump right back to ZBrush for more refining. To keep everything tileable I imported the plane I used for snapping my bricks onto. This plane I used to focus on when working on my bricks and grout. While sculpting I had wrap mode set to 1 for all my brushes, to ensure tiling. For the grout, I simply subdivided a larger plane a few times, put it between my bricks, and sculpted it just between the gabs.
When I was done I exported a heightmap, a color map, and a mask for my bricks. I could have also exported a normal map, but I wanted to add more detail in Designer, which is why I generated the normal from my height in Designer. The color map wasn’t the albedo, but a texture in which I had given a different color to each brick. This map I used in Designer with the directional warp node to warp a gradient for my albedo.

When I create my tiling textures from scratch in Designer, what I like to do is look for tutorials that I mix and change up in a way that fits my project. As a general rule when creating textures in Designer, it’s a good idea to first create a heightmap and from there you can create all the other textures. Of course, there can be cases or workflows in which it is different, but so far that was the best approach for me.
For your Diffuse map, if you have a texture with multiple components, like for example pebbles, grass, and the ground itself, you should create a color for each component separately and blend them together with masks. Don’t try to colorize everything with one gradient map. To have more control over the base color, I use an HSL node at the end.
I don’t know if I got the setup wrong, but the base color from Designer always gets exported as a 16bit texture. This leads to the issue that my texture is way too light in UE4. If you have this issue as well, the workaround I found is plugging the base color into a level node at the very end and changing the “Output Format” from “Relative to input” to “Absolute”. That way your base color will be exported as an 8bit texture.
My exterior ground texture was made with the help of Jacob Norris’ free “Forest Ground” tutorial (https://gumroad.com/l/tut-fg-fgs-all). Since I used his workflow for it, I’ll just recommend getting his tutorial, instead of explaining every little step here. The short version would be to create some basic tiling ground shapes in ZBrush, create meshes you want to scatter on your ground, and use the nanomesh function to do so. Export with Grab doc and get some variations in your texture with Photoshop.
Foliage
Creating the foliage was pretty straightforward. I collected references of grass and ferns and started sculpting. First, I made a single grass blade. I didn’t just sculpt it but also gave it some base color in ZBrush. Although you would never see the grass up close, I also like adding some small details to it, since you notice the difference even from far away. When I finished the grass blade I simply duplicated it and gave it slight variations. I repeated this two more times and created a dry grass blade, as well as a broken dry grass blade. Since grass in nature often isn’t just the same grass blades over and over, I also added a taller variant and panicles. Creating the panicle is the same as the grass blades. Check your reference, split it into the components it’s made of, and in the end assemble everything. When all were done I started assembling them into grass clumps.


For my tree and ferns, I used the same technique. While sculpting I recommend switching between different materials from time to time. Since they show highlights differently, you will get a better feeling of the actual shape of your sculpt.
Also, when coloring your mesh, especially when doing foliage, I really like using the SkinShade4 material. While it shows almost exactly the true color you’re painting, it also still slightly shows you the three-dimensional shape of the mesh, unlike the Flat Color material.
When exporting the textures, I export the base color with the Flat Color material, normal with NormalRGBMat and a mask with Flat Color, while turning the color option off for my meshes. Exporting a heightmap can help in creating the roughness texture in Photoshop. Since the mask you export from ZBrush probably won’t be perfectly black and white, I put a level adjustment on it in Photoshop.
The rest of the process is quite simple. In 3Ds Max I create a square plane and put my base color and opacity mask on it. Now I start cutting out the parts. While cutting I try to get rid of as much opacity as possible. Having a few more tris is not a big deal, since they cost almost nothing, while opacity is a lot heavier. When everything is cut out, I push some vertices around to get a more three-dimensional feel in my foliage.
For this project, I didn’t plan on putting any wind on my foliage so I didn’t apply any vertex color to the meshes. After assembling the planes to grass clumps, the last thing to do is get the vertex normal direction right. For that, I use the free NormalThieve script.
For grass I prefer to steal from a plane, instead of a hemisphere. When you steal from a plane all your normals will point straight upwards, which gives you the advantage that the grass will be lit the same way as your ground and blend nicer. For ferns and trees, I use a hemisphere.
When assembling a tree in 3Ds Max it’s important to consider what the player’s perspective will be. In modeling programs, you usually tend to work from a top-down position and then wonder why your tree doesn’t look the same in the engine from a first-person perspective. To avoid that just constantly check from the player’s perspective in your viewport. This of course applies to everything.
My setup for the foliage in UE4 was pretty basic but instead of just plugging the diffuse map into the base color output, I added the SpeedTreeColorVariation node which gives every instance of foliage a slightly different color. You can control the amount through a parameter. I learned about this in one of Quixel’s tutorials( https://www.youtube.com/watch?v=7NeUiHhHTjM&ab_channel=Quixel).

Lighting and Post Process
Early on in the project I already had a mood in mind, but since I don’t know a lot about lighting I asked my partner Isabel Seitz (who is a great lighting artist), for some tips about how I could approach it. In the end, I chose to use a slightly blueish Directional Light as my main light source and a Skylight with an HDRI from HDRIhaven. Since the shadow areas were still really dark, I decided to add a counter directional light with a slight orange tint. I set the intensity of that light pretty low, so shadows are just slightly lighter.
The interior is lit by two-point lights. One inside the furnace and one in the middle of the room with cast shadows off. Both are set to static. A few places were still a bit too dark, which I solved by placing spotlights with low intensities.
In post-processing, I barely needed to do anything. I only adjusted the exposure, put a slight vignette effect on it, and slightly pushed the saturation and contrast.

Conclusion
When starting this project my main goals, apart from creating something for my portfolio, were to learn to take my time with every asset and not to rush. Also putting more effort into pre-production. Until now I always just rushed into everything and wanted to begin the project.
Now I learned that spending a day or two to really plan out everything actually speeds up the process, while also helping you to improve your quality because you know what you want to build.
Another thing I learned through this project is that sometimes you just have to start doing it. In the past, I often thought “there has got to be a better and smarter way to do it”, so I hesitated to do it the way I knew would work and sometimes even just didn’t do it at all.
Finally, I just want to thank everyone in the Dinusty and EXP community who gave me feedback. Special thanks would be to Isabel Seitz and Martin Teichmann, who also always gave me feedback and pushed my smithy and skill to the next level.
Thanks to Stefan for allowing us to have such an in-depth look at his process. If you liked this environment breakdown and want to see more like it from other inspiring artist make sure to follow us on:
https://www.artstation.com/gamesartist

